
1. String类
C++中有两种主要的字符串类型:
C 风格字符串(C-strings):基于字符数组,以空字符 (
'\0') 结尾。C++
std::string类:更高级、功能更丰富的字符串类,封装了字符串操作的复杂性。
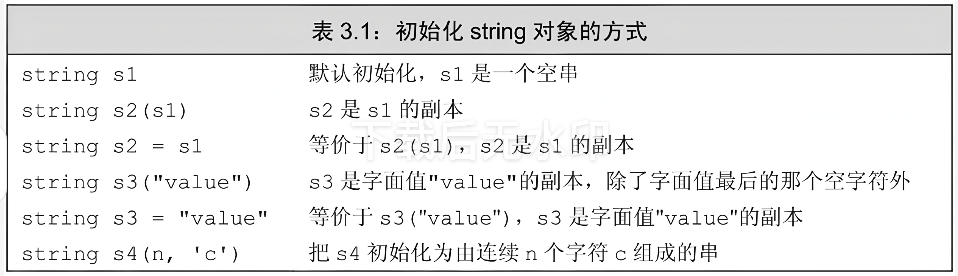
1.1 初始化
std::string 并不像 char 是C++的基本类型,它是C++标准库的一个类,位于<string> 头文件中,它的构造函数有很多种,可通过如下方式进行初始化:
举例:
1 | string(); // 默认构造 |
我们也可以通过赋值运算符进行 std::string 对象的初始化:
1 | string& operator= (const string& str); // 1 |
也可以从终端读取字符进行初始化:
1 | std::string input,line; |
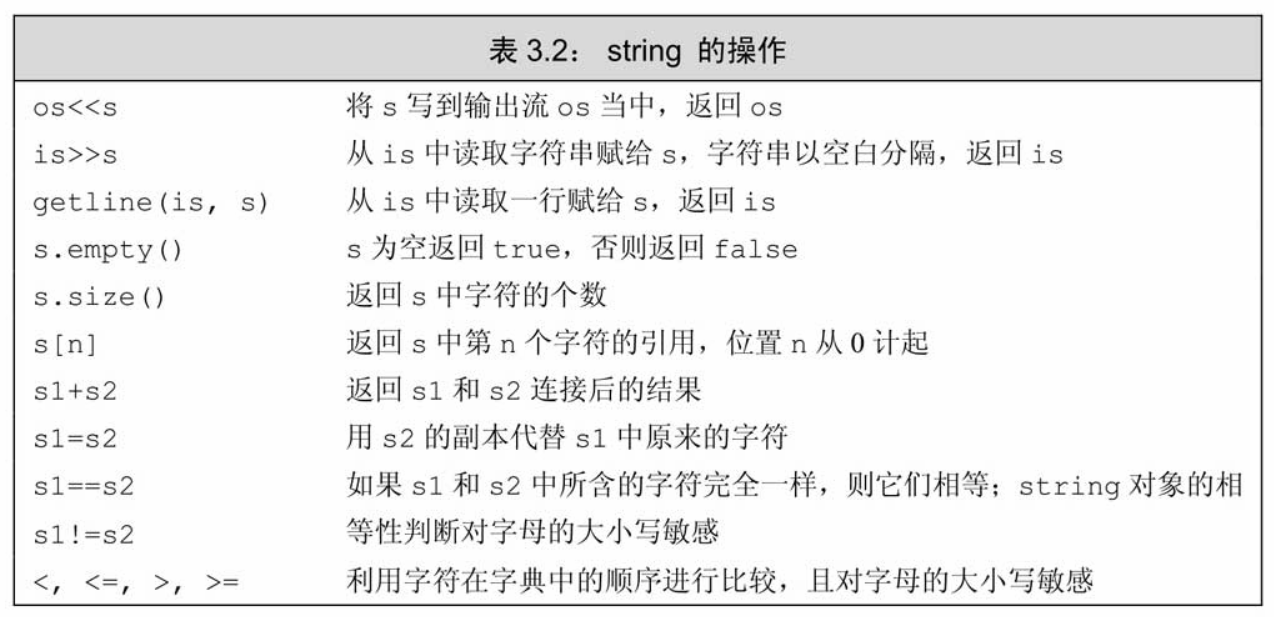
1.2 字符串操作
std::string 重载了很多符号,比如 =、+、!=、<、[]......,这使得它可以和其他 std::string 对象操作和比较。如下图所示:
1.2.1 拼接
我们可以通过 + 运算符、append() 函数以及 += 运算符将字符串拼接到指定字符串尾部,但如果想要将字符串拼接到指定字符串首部时,比如调用 + 运算符的友元函数;如果想要将字符串添加到 std::string 对象指定位置,可以使用 insert 函数:
1 | // append添加到尾部 |
1.2.2 清空、删除
如果我们想清空字符串,通过调用 clear() 函数可将字符串内容设置为 null:
1 | td::string strClear("strClear"); |
若想从字符串尾部删除字符,可通过 pop_back() 函数删除字符串末尾的 1 个字符:
1 | std::string str_hello ("hello world!"); |
若想删除指定字符串、指定位置的子字符串,可通过 erase() 函数实习:
1 | std::string str_erase ("This is an example sentence."); |
1.2.3 比较字符串
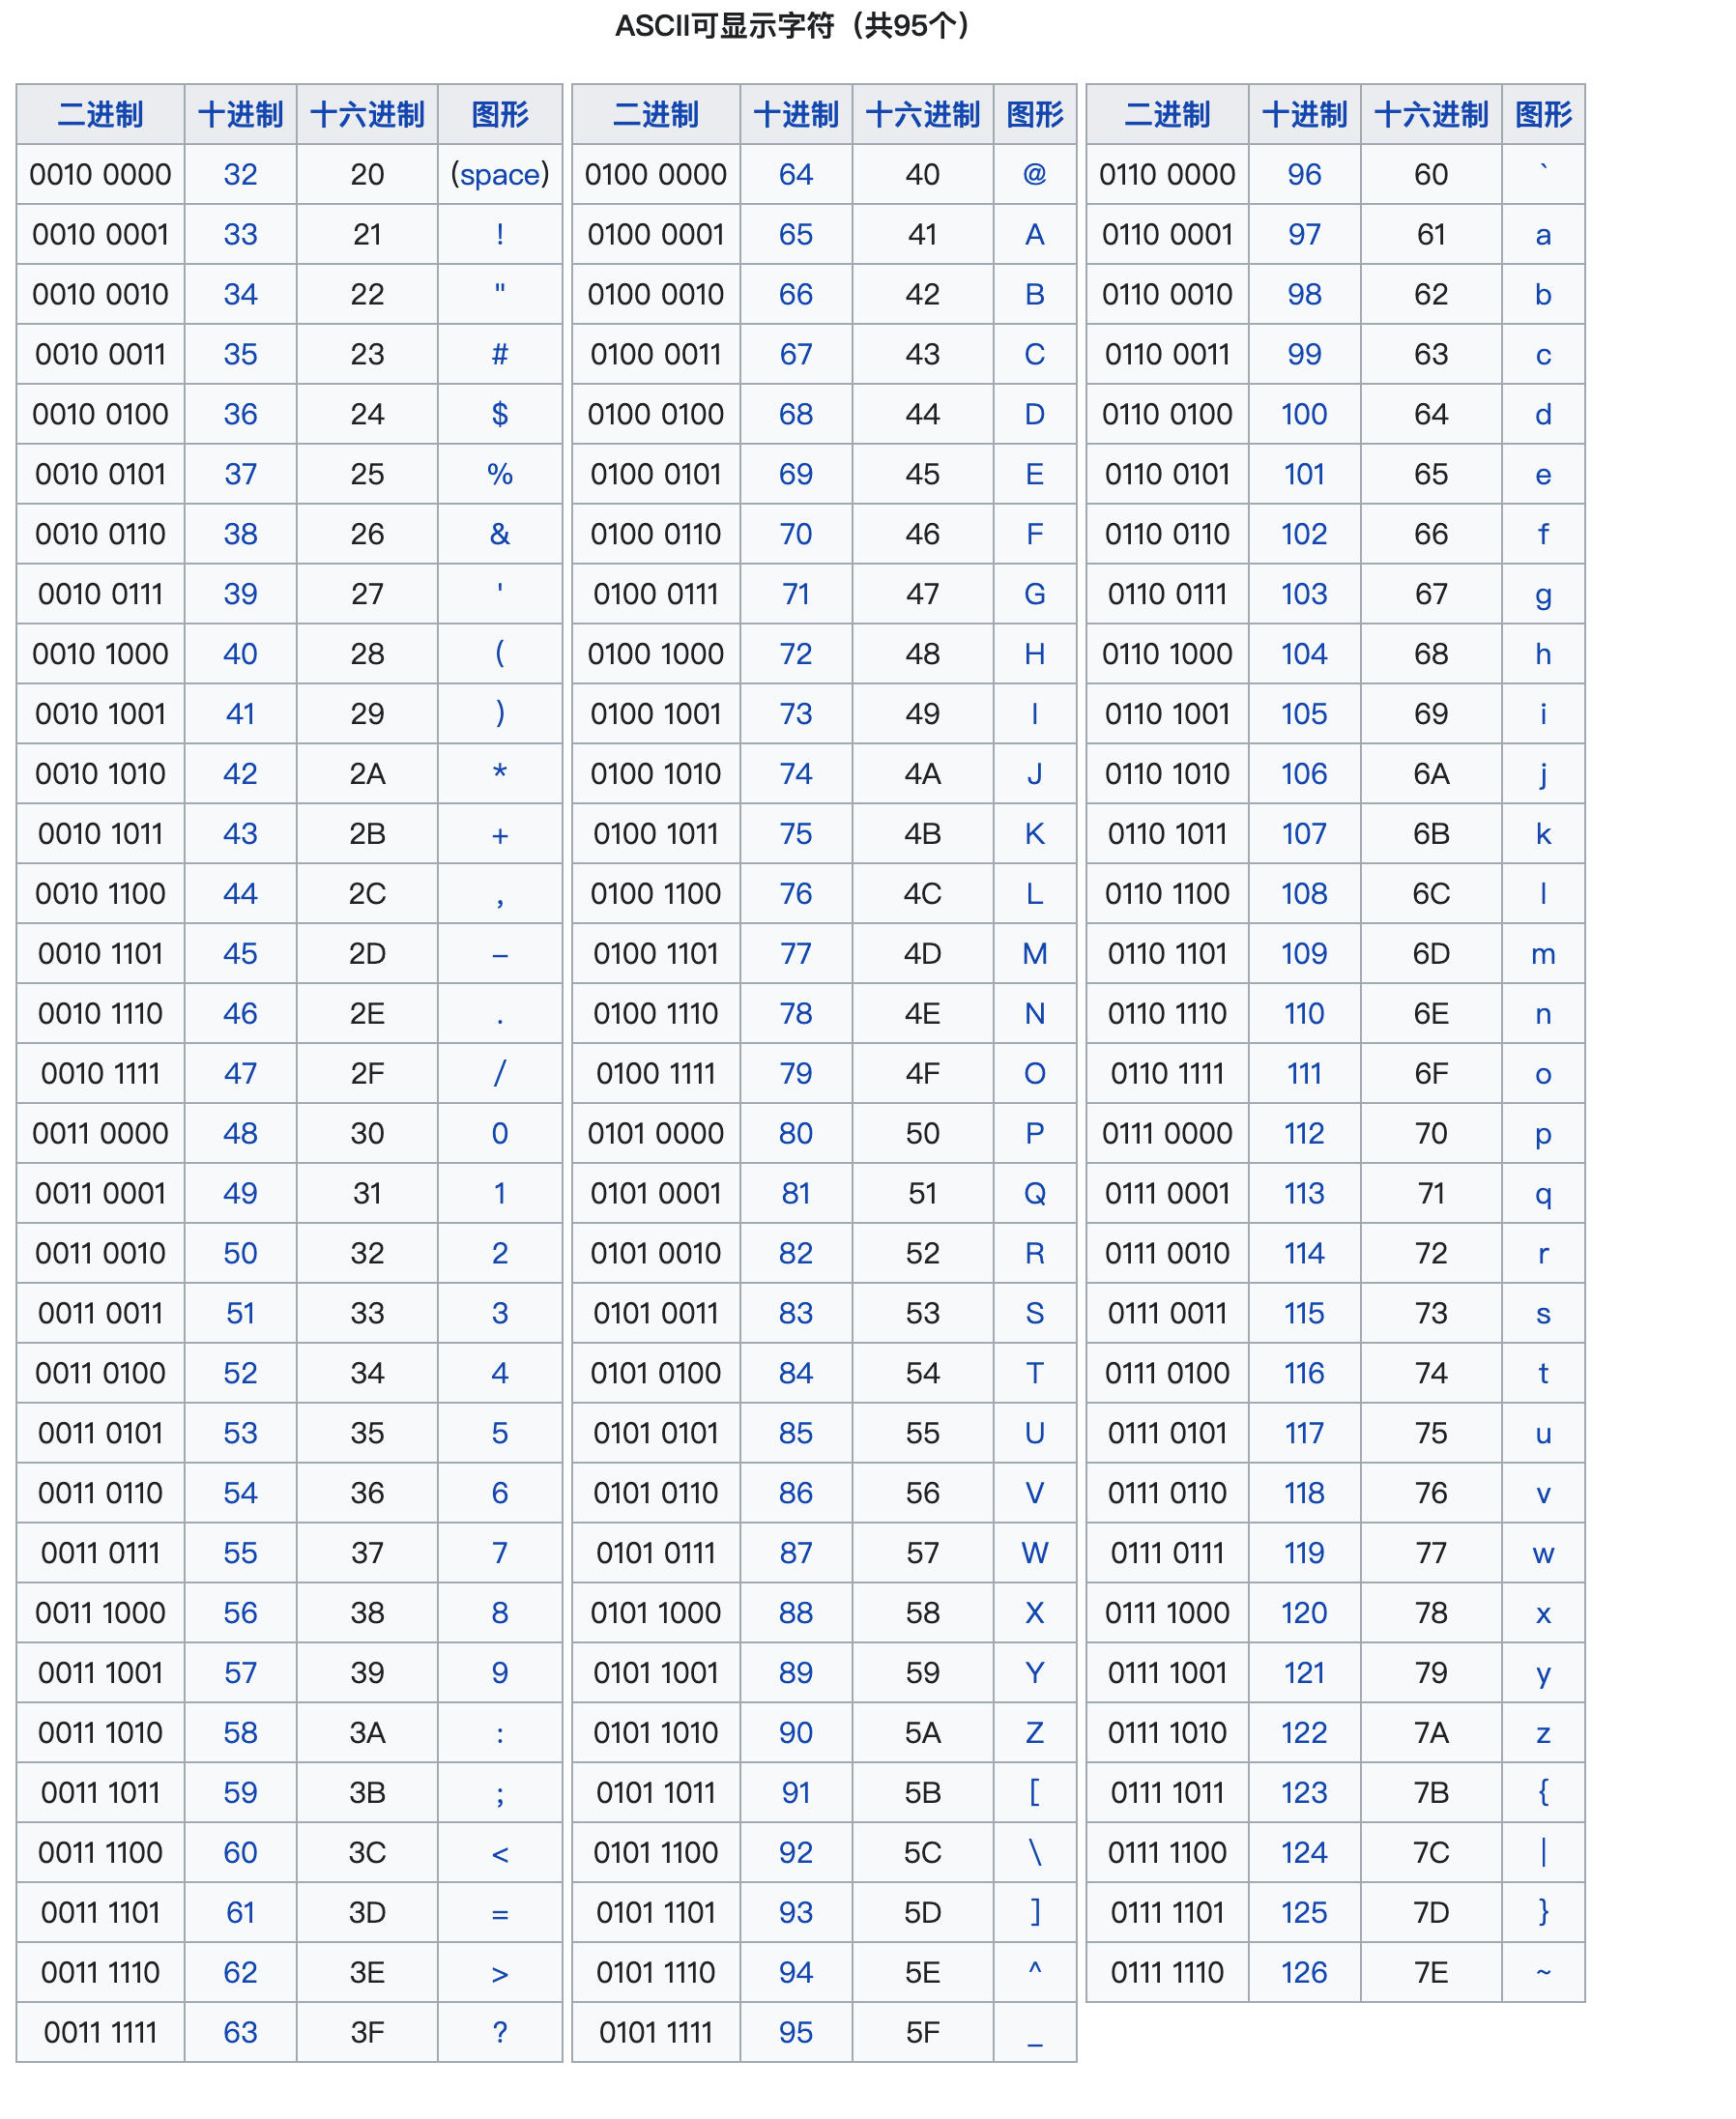
关于字符串的比较,其实是逐个位置按照字符比较,计算机中字符存储的方式是ASCII码表,每个字符对应一个ASCII码值,比较字符就是比较ASCII码值的大小:
我们通过重载的 ==, !=, <, >, <=, >= 运算符可实现字符串的比较:
1 | std::string a = "apple"; |
1.2.4 修改字符串
修改字符串大小:
我们可以通过 resize() 函数手动设置字符串的大小,比如:
将字符串的大小设置为size字符。如果size大于当前大小,则扩展字符串以使其长度为字符长,并将额外的字符添加到末尾(新字符若不指定,则默认为'\0‘)。如果size小于当前大小,则从末尾删除字符。
1 | // resize |
替换字符串:
我们也可以使用 replace() 函数将从索引位置开始的n个字符替换为后面的字符串,并返回对该字符串的引用:
1 | // 替换掉字符串的字符 |
交换字符串:
我们也可以使用 swap() 函数交换两个字符串:
1 | // 交换字符串 |
转换字符串格式:
我们可以转换字符串的格式,比如使用 std::stoi 将 std::string 类型转换为 int;也可以使用 std::to_string 将其他类型转换为 std::string:
1 | std::string str = "123"; |
1.2.5 字符串查询
查询字符串是否为空:empty()
1 | std::string str; |
查询字符串的字符个数:size()、length()、capacity()、max_size()
1 | // 返回此字符串中的字符数。相当于size()。 |
返回给定位置字符串的字符(不是删除):at()、[]、back()、front()、data()、c_str()
1 | // 获取字符串中给定位置的字符,position的范围:0 <= position < size() |
举例:
1 | std::string strQueryChar("strQueryChar"); |
查询是否包含指定的 子字符串、字符:
find:查询是否包含第一个参数指定的字符串或字符,成功则返回首次查询到的子串的索引,失败返回std::string::npos;rfind:从末端开始查询是否包含第一个参数指定的字符串或字符,并返回首次查询到的子串的索引,失败返回std::string::npos;find_first_of:在字符串中搜索与参数中指定的任何字符匹配的第一个字符。成功返回索引,失败返回std::string::npos;find_last_of:在字符串中搜索与参数中指定的任何字符匹配的最后一个字符。成功返回索引,失败返回std::string::npos;
1 | std::string str = "Hello, World! This is a test string."; |
获取一个 子字符串:
substr返回一个新构造的字符串对象,其值初始化为此对象的子字符串的副本:
1 | std::string str = "Hello, World!"; |
注意: 如果省略第二个参数,substr() 会返回从起始位置到字符串末尾的所有字符。
1 | std::string sub = str.substr(7); // 从位置7开始直到结束 |
1.2.6 判断字符串中的字符字母/数字/大小写
std::string 类中不包含对字符大小写/字母/数字判断的函数,需要我们包含头文件<cctype>:
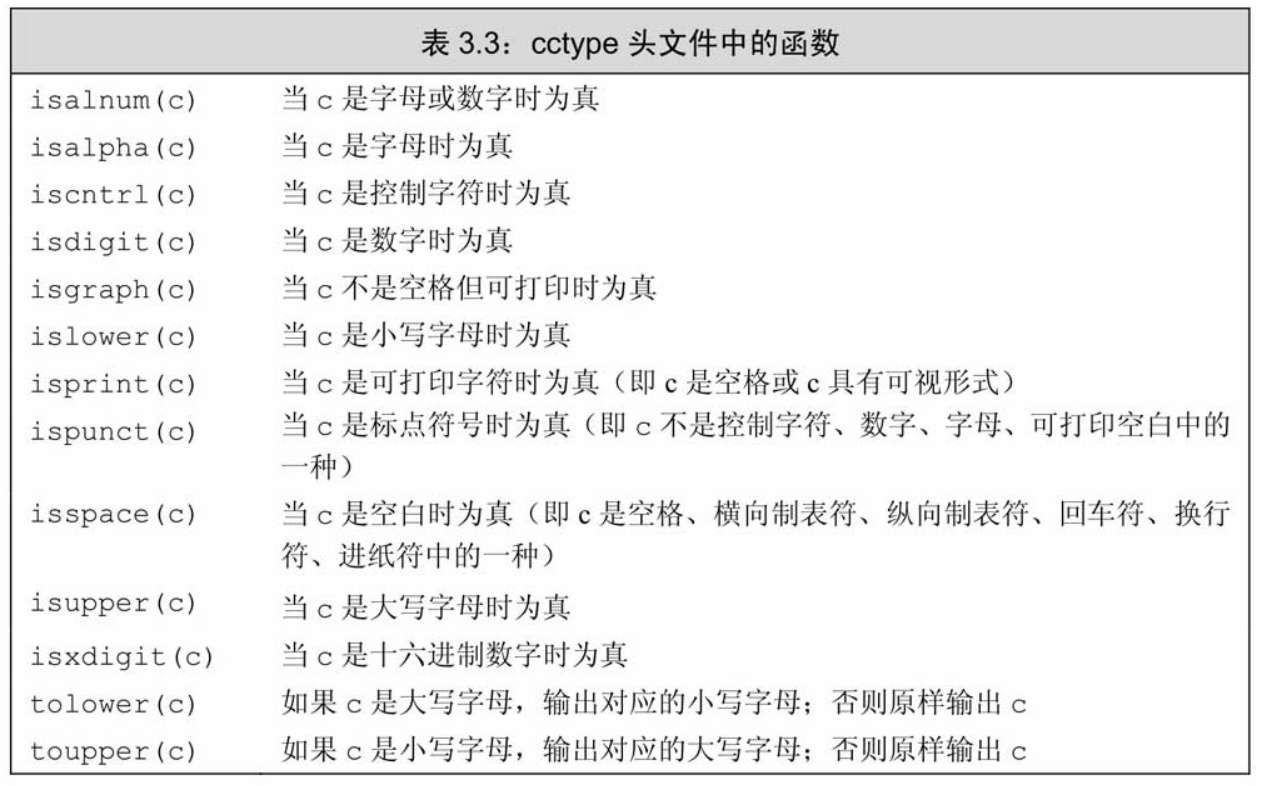
如果我们需要将指定字符串转换为大小写,我们需要使用<algorithm> 头文件中的std::transform,并结合 <cctype> 中的std::toupper 和 std::tolower实现:
1 |
|
1.3 其他高级用法
1.3.1 字符串流(stringstream)
std::stringstream 是 C++ 标准库中第 <sstream> 头文件提供的一个类,用于在内存中进行字符串的读写操作,类似于文件流。
1 |
|
1.3.2 正则表达式与字符串匹配
C++ 标准库提供了 <regex> 头文件,用于支持正则表达式。
1 | std::string text = "The quick brown fox jumps over the lazy dog."; |
1.4 简单的例子
示例项目1:简易文本分析器
需求分析:
创建一个程序,接受用户输入的一段文本,并提供以下功能:
统计单词数量
统计每个单词出现的次数
查找指定单词的出现次数
输出最长的单词
1 |
|
示例项目2:用户输入验证工具
需求分析:
编写一个程序,接受用户输入的电子邮件地址,并验证其格式是否正确。简单的验证标准:
包含一个
@符号@后面有一个.符号不包含空格
代码实现:
1 |
|
2. Vector
向量(Vector)是 C++ STL 中的一种序列式容器,能够动态地管理可变大小的连续数组。与传统的固定大小的数组不同,向量可以根据需要动态调整其大小,简单来说向量是一个能够存放任意类型的动态数组。是连续的。
注意:使用 std::vector 需要包含 <vector> 头文件
2.1 初始化
1 | std::vector<int> vec1; // 空向量 |
2.2 vector容器操作
2.2.1 vector的大小和容量
size():返回std::vector中当前实际存储的元素数量。capacity():返回std::vector目前已经分配的内存空间能够容纳的元素数量。empty():检查向量是否为空。
1 | std::vector<int> vec = {1, 2, 3}; |
可以使用 resize、reserve、shrink_to_fit 调整向量的大小。
1 | // 辅助函数,用于输出 vector 的大小和容量 |
resize(count)改变std::vector中的元素数量,如果不指定元素值会默认添加 0- 若
count大于当前大小,会在容器末尾添加新元素,可能会导致内存重新分配。 - 若
count小于当前大小,会移除容器末尾的元素,不会改变容量。
- 若
reserve(new_cap )为std::vector预留一定的内存空间,改变容器的容量,但不会改变容器中元素的数量,数量仍旧是之前的- 若
new_cap大于当前容量,会重新分配内存,将原有元素复制(或移动)到新的内存空间,释放旧内存,容器容量变为new_cap - 若
new_cap小于或等于当前容量,不会进行内存重新分配,容器容量保持不变。
- 若
shrink_to_fit用于释放多余的内存,使容器的容量尽可能接近当前大小
注意:reserve() 是改变容器容量,而 reverse() 是颠倒容器元素
2.2.2 添加和删除
vector 不能在首部添加元素,因为vector的内存是连续的内存空间,不能再头部额外分配内存添加元素,只能在尾部添加。如若要在头部添加元素,则需要把现有的元素整体往后移动一位,时间复杂度是O(n),效率太低。
push_back():在向量末尾添加一个元素,在外面构造好之后然后左值拷贝进去,右值移动进去emplace_back():在向量末尾添加一个元素,直接在容器内构造pop_back():删除向量末尾的一个元素。insert():在指定位置插入元素。erase():移除指定位置的元素或范围内的元素。clear():移除所有元素。
1 | std::vector<int> vec; |
2.2.3 访问
operator[]:通过索引访问元素。at():通过索引访问元素,带边界检查。front():访问第一个元素。back():访问最后一个元素。
1 | std::vector<std::string> fruits = {"Apple", "Banana", "Cherry"}; |
2.2.4 遍历
- C++ 新特性
- 迭代器
1 | std::vector<int> numbers = {1, 2, 3, 4, 5}; |
2.2.5 vector修改
修改内存:
- 使用
reserve()可以提前为向量分配足够的内存,减少内存重新分配的次数,提高性能。 - 使用
shrink_to_fit()可以请求收缩向量的容量以匹配其大小,释放多余的内存。
修改元素:
通过索引或
at()修改使用
assign()重新赋值替换整个向量内容
1 | std::vector<int> vec = {10, 20, 30, 40, 50}; |
2.3 常用算法
2.3.1 排序
可以使用 <algorithm> 头文件中的 sort() 函数对向量进行升序降序:
1 | std::vector<int> numbers = {50, 20, 40, 10, 30}; |
2.3.2 反转reverse()
使用 reverse() 函数可以反转向量中的元素顺序。
1 | std::vector<char> letters = {'A', 'B', 'C', 'D', 'E'}; |
2.3.3 查找find()
string 的 find 有四种,但是返回索引,而 vector 返回的是 iterator。但我们可以通过 std::distance 间接求得索引值。
1 | std::vector<std::string> fruits = {"Apple", "Banana", "Cherry", "Date"}; |
std::distance(fruits.begin(), it) 用于求两个迭代器之间的长度。
3. list
list是一个实现了双向链表的数据结构,适合在容器中间频繁插入和删除元素。与vector不同,list不支持随机访问,但在任何位置的插入和删除操作都是常数时间。list 是离散的,不像 vector 一样是连续的。
3.1 初始化
1 | list<int> lt1; //构造int类型的空容器 |
3.2 list操作
3.2.1 list的大小和容量
size()函数用于获取当前容器当中的元素个数resize()可以重新指定list的大小,并根据需要插入或删除list中的元素来达到指定的大小void resize(size_type count, const T& value = T()):会将列表的大小调整为count。如果count大于当前列表的大小,则在列表末尾插入足够数量的值为value的元素。如果count小于当前列表的大小,则删除超出count的元素void resize(size_type count):将列表的大小调整为count。如果count大于当前列表的大小,则在列表末尾插入默认构造的元素。如果count小于当前列表的大小,则删除超出count的元素。
empty()判断list是否为空,如果为空,返回true;如果非空,返回falseclear()用于清空容器,清空后容器的size为0,但是头节点(哨兵位)不会被清除
std::list 没有 reverse(),因为 std::list 的元素在内存中是通过节点连接起来的,每个节点包含数据以及指向前一个节点和后一个节点的指针。链表的节点在内存中可以是不连续的,每当需要插入一个新元素时,只需要动态分配一个新的节点,并将其插入到链表中合适的位置即可,不需要像 std::vector 那样重新分配一大块连续的内存空间。
3.2.2 访问
front()——访问list头元素back()——访问list尾元素
不能像 std::vector一样可以通过 at() 和 [] 进行元素访问。
1 | list<int> mylist {1, 2, 3, 4, 5, 6, 7, 8}; |
若想要访问其他位置的元素,可通过迭代器来间接访问:
- 使用迭代器手动遍历
- 使用
std::advance函数,将迭代器向前或向后移动指定的步数 - 使用
std::next函数,从给定迭代器向前移动指定步数后的位置
3.2.3 常见修改操作
| 接口名称 | 接口名称 |
|---|---|
| push_front | 在list首元素前插入值为val的元素 |
| pop_front | 删除list中第一个元素 |
| push_back | 在list尾部插入值为val的元素 |
| pop_back | 删除list中最后一个元素 |
| insert(⭐) | 在list position 位置中插入值为val的元素 |
| erase(⭐) | 删除list position位置的元素 |
| swap | 交换两个list中的元素,list1.swap(list2),两个list存储的元素类型必须相同,元素个数可以不同 |
这里着重学习 insert() 和 earse() 两个函数:
insert() 共有三种形式:
1 | insert(iterator, value); |
- 使用
insert(iterator,value)方法,作用是向iterator迭代器指向元素的前边添加一个元素value,并返回一个迭代器指向新插入的元素。 - 使用
insert(iterator,num,value)方法,作用是向iterator迭代器指向元素的前边添加num个元素value,并返回一个迭代器指向新插入的第一个元素。 - 使用
insert(iterator, iterator1, iterator2);方法,作用是向iterator迭代器指向元素的前边添加[iterator1,iterator2)之间的元素
1 | // 初始化一个 list |
erase() 共有 两 种形式:
1 | list.erase(iterator) |
list.erase(iterator)这种用法会删除迭代器iterator指向的元素,返回指向下一个元素的迭代器。list.erase(iterator1,iterator2)这种用法会删除迭代器iterator1指向的元素到iterator2指向元素之间的元素,包括iterator1指向的元素但不包括iterator2指向的元素,即擦除[iterator1,iterator2),返回指向iterator2所指向元素的迭代器
1 | // 初始化一个 list |
3.2.4 常见操作函数
| 接口名称 | 接口名称 |
|---|---|
| splice | 将元素从列表转移到其它列表 |
| remove | 删除具有特定值的元素 |
| remove_if | 删除满足条件的元素 |
| unique | 删除重复值 |
| sort | 容器中的元素排序 |
| merge | 合并排序列表 |
| reverse | 反转元素的顺序 |
std::vector 中没有 sort()、reverse() 成员函数,但可以通过 std:: 的算法 std::sort()、std::reverse() 实现,而list中有 sort()、reverse() 成员函数
a)splice()
splice共有三种形式,分别为:
splice(iterator_pos, otherList): 将otherList中的所有元素移动到iterator_pos指向元素之前splice(iterator_pos, otherList, iter1): 从otherList转移iter1指向的元素到当前list。元素被插入到iterator_pos指向的元素之前。splice(iterator_pos, otherList, iter_start, iter_end): 从otherList转移范围[iter_start, iter_end)中的元素到 当前列表。元素被插入到iterator_pos指向的元素之前。
1 | // 创建两个 std::list 容器 |
b)remove
std::list 的 remove 方法用于从列表中移除与指定值相等的元素
1 | std::list<int> mylist {1, 2, 3, 4, 5}; |
c)remove_if()——移除满足特定标准的元素
1 | bool isEven(int n) { |
d)unique()——删除连续的重复元素
unique()方法用于移除链表中相邻且重复的元素,仅保留一个副本。
1 | std::list<int> myList = {1, 2, 2, 3, 3, 4, 5, 5, 5}; |
e)sort()——对元素进行排序
sort()方法用于对链表中的元素进行排序。默认情况下,它按升序对元素进行排序,使用元素类型的 < 运算符进行比较。
1 | // 自定义比较函数,用于降序排序 |
f)merge()——合并list
merge()方法将另一个列表的元素插入到调用方法的列表中,并保持排序顺序
注意:merge()方法只能用于已排序的list。如果list未排序,则合并的结果将是不正确的。
1 | std::list<int> list1 = {1, 3, 5}; |
g)reverse()——将该链表的所有元素的顺序反转
reverse()方法用于反转链表中元素的顺序,即将链表中的第一个元素变为最后一个元素,第二个元素变为倒数第二个元素,以此类推
1 | std::list<int> myList = {1, 2, 3, 4, 5}; |
h)assign()——将值赋给容器
assign()方法用于将链表中的元素替换为新的元素序列。它可以接受不同形式的参数,提供了两种重载形式。
- 第一种形式接受迭代器范围作为参数,用于将另一个容器或数组中的元素复制到链表中。它会将链表清空,并将指定范围内的元素复制到链表中。
void assign(InputIterator first, InputIterator last); - 第二种形式接受一个元素数量和一个值作为参数,用于将指定数量的相同值的元素分配给链表。它会将链表清空,并将指定数量的元素赋值为指定的值。
void assign(size_type count, const T& value);
1 | // 创建一个空的 std::list |
4. deque
deque(双端队列)是一种支持在两端高效插入和删除元素的序列容器。与vector相比,deque支持在前端和后端均以常数时间进行插入和删除操作。
deque通常由一系列固定大小的数组块组成,这些块通过一个中央映射数组进行管理。这种结构使得在两端扩展时不需要重新分配整个容器的内存,从而避免了vector在前端插入的高成本。
4.1 初始化
1 | std::deque<int> myDeque; |
4.2 成员函数
| 函数成员 | 函数功能 |
|---|---|
| begin() | 返回指向容器中第一个元素的迭代器。 |
| end() | 返回指向容器最后一个元素所在位置后一个位置的迭代器,通常和 begin() 结合使用。 |
| rbegin() | 返回指向最后一个元素的迭代器。 |
| rend() | 返回指向第一个元素所在位置前一个位置的迭代器。 |
| cbegin() | 和 begin() 功能相同,只不过在其基础上,增加了 const 属性,不能用于修改元素。 |
| cend() | 和 end() 功能相同,只不过在其基础上,增加了 const 属性,不能用于修改元素。 |
| crbegin() | 和 rbegin() 功能相同,只不过在其基础上,增加了 const 属性,不能用于修改元素。 |
| crend() | 和 rend() 功能相同,只不过在其基础上,增加了 const 属性,不能用于修改元素。 |
| size() | 返回实际元素个数。 |
| max_size() | 返回容器所能容纳元素个数的最大值。这通常是一个很大的值,一般是 2^32-1,我们很少会用到这个函数。 |
| resize() | 改变实际元素的个数,若大于size(),则插入指定元素,默认0;若小于size(),删除末尾的元素 |
| empty() | 判断容器中是否有元素,若无元素,则返回 true;反之,返回 false。 |
| shrink _to_fit() | 将内存减少到等于当前元素实际所使用的大小。 |
| at() | 使用经过边界检查的索引访问元素。 |
| [] | 支持索引访问,不进行边界检查,如果索引越界,会抛出 std::out_of_range 异常。范围从0~deque.size() - 1 |
| front() | 返回第一个元素的引用。 |
| back() | 返回最后一个元素的引用。 |
| assign() | 用新元素替换原有内容。 |
| push_back() | 在序列的尾部添加一个元素。 |
| push_front() | 在序列的头部添加一个元素。 |
| pop_back() | 移除容器尾部的元素。 |
| pop_front() | 移除容器头部的元素。 |
| insert() | 在指定的位置插入一个或多个元素。 |
| erase() | 移除一个元素或一段元素。 |
| clear() | 移出所有的元素,容器大小变为 0。 |
| swap() | 交换两个容器的所有元素。 |
| emplace() | 在指定的位置直接生成一个元素 |
| emplace_front() | 在容器头部生成一个元素。和 push_front() 的区别是,该函数直接在容器头部构造元素,省去了复制移动元素的过程。 |
| emplace_back() | 在容器尾部生成一个元素。和 push_back() 的区别是,该函数直接在容器尾部构造元素,省去了复制移动元素的过程。 |
和 vector 相比,额外增加了实现在容器头部添加和删除元素的成员函数,同时删除了
capacity()、reserve()成员函数。
std::deque 采用分段连续存储的方式,它会根据需要动态地分配和释放内存块,不需要一次性分配一大块连续的内存。因此,std::deque 没有 capacity() 和 reserve() 成员函数。当需要添加元素时,std::deque 会在合适的内存块上进行操作,或者在必要时分配新的内存块,而不需要预先分配大量的内存。
5. 三种序列式容器的特点
| 特性 | vector |
deque |
list |
|---|---|---|---|
| 内存结构 | 单一连续内存块 | 多块连续内存,通过映射数组管理 | 双向链表 |
| 随机访问 | 是,常数时间(O(1)) | 是,常数时间(O(1)) | 否,需要线性时间(O(n)) |
| 前端插入/删除 | 低效,线性时间(O(n)) | 高效,常数时间(O(1)) | 高效,常数时间(O(1)) |
| 末端插入/删除 | 高效,常数时间(O(1)) | 高效,常数时间(O(1)) | 高效,常数时间(O(1)) |
| 内存碎片 | 低,由于单一连续内存块 | 较高,由于多块内存管理 | 较高,由于节点分散在内存中 |
| 元素隔离 | 高,局部性较好 | 中等,分块存储提高了部分局部性 | 低,元素分散存储,缓存效率低 |
| 应用场景 | 需要频繁随机访问、末端操作的场景 | 需要频繁在两端插入/删除且可以随机访问的场景 | 需要频繁在中间插入/删除且不需要随机访问的场景 |
6. map、unordered_map
map是一个关联容器,用于存储键值对(key-value)。它基于键自动排序,且每个键都是唯一的,且存储后不能被修改。map提供了快速的查找、插入和删除操作。通常使用自平衡的二叉搜索树(如红黑树、AVL树)实现。这确保了所有操作的时间复杂度为对数时间(O(log n)),且元素按照键的顺序排列。unordered_map也是一种关联容器,用于存储键值对,但它不保证元素的顺序。unordered_map基于哈希表实现,提供了平均常数时间(O(1))的查找、插入和删除操作。
在使用 unordered_map 和 unordered_set 时需注意,我们不能使用哈希表实现的无序map或者set存储标准库不提供默认哈希函数的类型,比如:自定义类型(自定义的类、结构体)、复合类型(std::pair、std::tuple);但我们可以存储:所有整数类型、浮点类型、指针类型(尽管我们不能直接存储自定义类型,但可以将其指针存进来)、string。
而 map 和 set 基于红黑树实现,只能存储支持比较操作 operator< 的类型,并且可复制和可移动。
对比:
| 操作 | map |
unordered_map |
|---|---|---|
| 查找 | O(log n) |
平均 O(1) |
| 插入 | O(log n) |
平均 O(1) |
| 删除 | O(log n) |
平均 O(1) |
| 内存使用 | 较高 | 较低 |
| 元素顺序 | 有序 | 无序 |
| 使用场景 | 需要按键的顺序遍历元素 需要有序的关联数组 需要高效的范围查找 |
对元素顺序没有要求 需要极高效的查找、插入和删除操作 不需要自定义的排序规则 |
6.1 map 初始化
map 容器的模板定义如下:
1 | template < class Key, // 指定键(key)的类型 |
可以看到,map 容器模板有 4 个参数,其中后 2 个参数都设有默认值。大多数场景中,我们只需要设定前 2 个参数的值,有些场景可能会用到第 3 个参数,但最后一个参数几乎不会用到。
map 容器的模板类中包含多种构造函数,因此创建 map 容器的方式也有多种,下面就几种常用的创建 map 容器的方法,做一一讲解。
- 通过调用
map容器类的默认构造函数,可以创建出一个空的map容器,比如:
1 | std::map<std::string, int>myMap; |
通过此方式创建出的 myMap 容器,初始状态下是空的,即没有存储任何键值对。鉴于空 map 容器可以根据需要随时添加新的键值对,因此创建空 map 容器是比较常用的。
- 当然在创建
map容器的同时,也可以通过列表初始化进行初始化,比如:
1 | std::map<std::string, int>myMap{ {"C语言教程",10},{"STL教程",20} }; |
由此,myMap 容器在初始状态下,就包含有 2 个键值对。
再次强调,map 容器中存储的键值对,其本质都是 pair 类模板创建的 pair 对象。因此,下面程序也可以创建出一模一样的 myMap 容器:
1 | std::map<std::string, int>myMap{std::make_pair("C语言教程",10),std::make_pair("STL教程",20)}; |
- 除此之外,在某些场景中,可以利用先前已创建好的
map容器,再创建一个新的map容器。例如:
1 | std::map<std::string, int>newMap(myMap); |
由此,通过调用 map 容器的拷贝构造函数,即可成功创建一个和 myMap 完全一样的 newMap 容器。
C++ 11 标准中,还为 map 容器增添了移动构造函数。当有临时的 map 对象作为参数,传递给要初始化的 map 容器时,此时就会调用移动构造函数。举个例子:
1 | //调用 map 类模板的移动构造函数创建 newMap 容器 |
注意,无论是调用复制构造函数还是调用拷贝构造函数,都必须保证这 2 个容器的类型完全一致。
map类模板还支持取已建map容器中指定区域内的键值对,创建并初始化新的map容器。例如:
1 | std::map<std::string, int>myMap{ {"C语言教程",10},{"STL教程",20} }; |
这里,通过调用 map 容器的双向迭代器,实现了在创建 newMap 容器的同时,将其初始化为仅包含一个 {“STL教程”,20} 键值对的容器。
- 当然,在以上几种创建
map容器的基础上,我们都可以手动修改map容器的排序规则。默认情况下,map容器调用std::less<T>规则,根据容器内各键值对的键的大小,对所有键值对做升序排序。因此,如下 2 行创建map容器的方式,其实是等价的:
1 | std::map<std::string, int>myMap{ {"C语言教程",10},{"STL教程",20} }; |
以上 2 中创建方式生成的 myMap 容器,其内部键值对排列的顺序为:
<”C语言教程”, 10>
<”STL教程”, 20>
下面程序手动修改了 myMap 容器的排序规则,令其作降序排序:
1 | std::map<std::string, int, std::greater<std::string> >myMap{ {"C语言教程",10},{"STL教程",20} }; |
此时,myMap 容器内部键值对排列的顺序为:
<”STL教程”, 20>
<”C语言教程”, 10>
6.2 map 成员方法
| 成员方法 | 功能 |
|---|---|
| begin() | 返回指向容器中第一个(注意,是已排好序的第一个)键值对的双向迭代器。如果 map 容器用 const 限定,则该方法返回的是 const 类型的双向迭代器。 |
| end() | 返回指向容器最后一个元素(注意,是已排好序的最后一个)所在位置后一个位置的双向迭代器,通常和 begin() 结合使用。如果 map 容器用 const 限定,则该方法返回的是 const 类型的双向迭代器。 |
| rbegin() | 回指向最后一个(注意,是已排好序的最后一个)元素的反向双向迭代器。如果 map 容器用 const 限定,则该方法返回的是 const 类型的反向双向迭代器。 |
| rend() | 返回指向第一个(注意,是已排好序的第一个)元素所在位置前一个位置的反向双向迭代器。如果 map 容器用 const 限定,则该方法返回的是 const 类型的反向双向迭代器。 |
| cbegin() | 和 begin() 功能相同,只不过在其基础上,增加了 const 属性,不能用于修改容器内存储的键值对。 |
| cend() | 和 end() 功能相同,只不过在其基础上,增加了 const 属性,不能用于修改容器内存储的键值对。 |
| crbegin() | 和 rbegin() 功能相同,只不过在其基础上,增加了 const 属性,不能用于修改容器内存储的键值对。 |
| crend() | 和 rend() 功能相同,只不过在其基础上,增加了 const 属性,不能用于修改容器内存储的键值对。 |
| find(key) | 在 map 容器中查找键为 key 的键值对,如果成功找到,则返回指向该键值对的双向迭代器;反之,则返回和 end() 方法一样的迭代器。另外,如果 map 容器用 const 限定,则该方法返回的是 const 类型的双向迭代器。 |
| lower_bound(key) | 返回一个指向当前 map 容器中第一个大于或等于 key 的键值对的双向迭代器。如果 map 容器用 const 限定,则该方法返回的是 const 类型的双向迭代器。 |
| upper_bound(key) | 返回一个指向当前 map 容器中第一个大于 key 的键值对的迭代器。如果 map 容器用 const 限定,则该方法返回的是 const 类型的双向迭代器。 |
| equal_range(key) | 该方法返回一个 pair 对象(包含 2 个双向迭代器),其中 pair.first 和 lower_bound() 方法的返回值等价,pair.second 和 upper_bound() 方法的返回值等价。也就是说,该方法将返回一个范围,该范围中包含的键为 key 的键值对(map 容器键值对唯一,因此该范围最多包含一个键值对)。 |
| empty() | 若容器为空,则返回 true;否则 false。 |
| size() | 返回当前 map 容器中存有键值对的个数。 |
| max_size() | 返回 map 容器所能容纳键值对的最大个数,不同的操作系统,其返回值亦不相同。 |
| operator[] | map容器重载了 [] 运算符,只要知道 map 容器中某个键值对的键的值,就可以向获取数组中元素那样,通过键直接获取对应的值。 我们也可以通过 [] 来添加键值对。如果键已经存在,会修改对应的值;若键不存在,则可以使用 [] 运算符插入或修改键值对。 |
| at(key) | 找到 map 容器中 key 键对应的值,如果找不到,该函数会引发 out_of_range 异常。 |
| insert() | 向 map 容器中插入键值对。myMap.insert(std::make_pair("banana", 2));、myMap.insert({ "cherry", 3 }); |
| erase() | 删除 map 容器指定位置、指定键(key)值或者指定区域内的键值对。 |
| swap() | 交换 2 个 map 容器中存储的键值对,这意味着,操作的 2 个键值对的类型必须相同。 |
| clear() | 清空 map 容器中所有的键值对,即使 map 容器的 size() 为 0。 |
| emplace() | 在当前 map 容器中的指定位置处构造新键值对。其效果和插入键值对一样,但效率更高。emplace 方法返回一个 std::pair,其中 first 是一个迭代器,指向插入的元素或者已经存在的具有相同键的元素;second 是一个布尔值,表示是否成功插入了新元素(如果键已经存在,则插入失败,second 为 false;否则,插入成功,second 为 true)。 |
| emplace_hint() | 在本质上和 emplace() 在 map 容器中构造新键值对的方式是一样的,不同之处在于,使用者必须为该方法提供一个指示键值对生成位置的迭代器,并作为该方法的第一个参数。 |
| count(key) | 在当前 map 容器中,查找键为 key 的键值对的个数并返回。注意,由于 map 容器中各键值对的键的值是唯一的,因此该函数的返回值最大为 1。 |
6.3 unordered_map 初始化
unordered_map 容器模板的定义如下所示:
1 | template < class Key, //键值对中键的类型 |
以上 5 个参数中,必须显式给前 2 个参数传值,并且除特殊情况外,最多只需要使用前 4 个参数,各自的含义和功能如下表所示。
| 参数 | 含义 |
|---|---|
<key,T> |
前 2 个参数分别用于确定键值对中键和值的类型,也就是存储键值对的类型。 |
Hash = hash<Key> |
用于指明容器在存储各个键值对时要使用的哈希函数,默认使用 STL 标准库提供的 hash<key> 哈希函数。注意,默认哈希函数只适用于基本数据类型(包括 string 类型),而不适用于自定义的结构体或者类。 |
Pred = equal_to<Key> |
要知道,unordered_map 容器中存储的各个键值对的键是不能相等的,而判断是否相等的规则,就由此参数指定。默认情况下,使用 STL 标准库中提供的 equal_to<key> 规则,该规则仅支持可直接用 == 运算符做比较的数据类型。 |
总的来说,当无序容器中存储键值对的键为自定义类型时,默认的哈希函数
hash以及比较函数equal_to将不再适用,只能自己设计适用该类型的哈希函数和比较函数,并显式传递给 Hash 参数和 Pred 参数。
常见的创建 unordered_map 容器的方法有以下几种。
- 通过调用
unordered_map模板类的默认构造函数,可以创建空的unordered_map容器。比如:
1 | std::unordered_map<std::string, std::string> umap; |
由此,就创建好了一个可存储 <string,string> 类型键值对的 unordered_map 容器。
- 当然,在创建
unordered_map容器的同时,可以完成初始化操作。比如:
1 | std::unordered_map<std::string, std::string> umap{ |
通过此方法创建的 umap 容器中,就包含有 3 个键值对元素。
- 另外,还可以调用
unordered_map模板中提供的复制(拷贝)构造函数,将现有unordered_map容器中存储的键值对,复制给新建unordered_map容器。例如,在第二种方式创建好umap容器的基础上,再创建并初始化一个umap2容器:
1 | std::unordered_map<std::string, std::string> umap2(umap); |
由此,umap2 容器中就包含有 umap 容器中所有的键值对。
除此之外,C++ 11 标准中还向 unordered_map 模板类增加了移动构造函数,即以右值引用的方式将临时 unordered_map 容器中存储的所有键值对,全部复制给新建容器。例如:
1 | //返回临时 unordered_map 容器的函数 |
注意,无论是调用复制构造函数还是拷贝构造函数,必须保证 2 个容器的类型完全相同。
- 当然,如果不想全部拷贝,可以使用
unordered_map类模板提供的迭代器,在现有unordered_map容器中选择部分区域内的键值对,为新建unordered_map容器初始化。例如:
1 | //传入 2 个迭代器, |
通过此方式创建的 umap2 容器,其内部就包含 umap 容器中除第 1 个键值对外的所有其它键值对。
6.4 unordered_map 成员方法
unordered_map 既可以看做是关联式容器,更属于自成一脉的无序容器。因此在该容器模板类中,既包含一些在学习关联式容器时常见的成员方法,还有一些属于无序容器特有的成员方法。
| 成员方法 | 功能 |
|---|---|
| begin() | 返回指向容器中第一个键值对的正向迭代器。 |
| end() | 返回指向容器中最后一个键值对之后位置的正向迭代器。 |
| cbegin() | 和 begin() 功能相同,只不过在其基础上增加了 const 属性,即该方法返回的迭代器不能用于修改容器内存储的键值对。 |
| cend() | 和 end() 功能相同,只不过在其基础上,增加了 const 属性,即该方法返回的迭代器不能用于修改容器内存储的键值对。 |
| empty() | 若容器为空,则返回 true;否则 false。 |
| size() | 返回当前容器中存有键值对的个数。 |
| max_size() | 返回容器所能容纳键值对的最大个数,不同的操作系统,其返回值亦不相同。 |
| operator[key] | 该模板类中重载了 [] 运算符,其功能是可以向访问数组中元素那样,只要给定某个键值对的键 key,就可以获取该键对应的值。注意,如果当前容器中没有以 key 为键的键值对,则其会使用该键向当前容器中插入一个新键值对。 |
| at(key) | 返回容器中存储的键 key 对应的值,如果 key 不存在,则会抛出 out_of_range 异常。 |
| find(key) | 查找以 key 为键的键值对,如果找到,则返回一个指向该键值对的正向迭代器;反之,则返回一个指向容器中最后一个键值对之后位置的迭代器(如果 end() 方法返回的迭代器)。 |
| count(key) | 在容器中查找以 key 键的键值对的个数。 |
| equal_range(key) | 返回一个 pair 对象,其包含 2 个迭代器,用于表明当前容器中键为 key 的键值对所在的范围。 |
| emplace() | 向容器中添加新键值对,效率比 insert() 方法高。emplace 方法返回一个 std::pair,其中 first 是一个迭代器,指向插入的元素或者已经存在的具有相同键的元素;second 是一个布尔值,表示是否成功插入了新元素(如果键已经存在,则插入失败,second 为 false;否则,插入成功,second 为 true)。 |
| emplace_hint() | 向容器中添加新键值对,效率比 insert() 方法高。 |
| insert() | 向容器中添加新键值对。 |
| erase() | 删除指定键值对。 |
| clear() | 清空容器,即删除容器中存储的所有键值对。 |
| swap() | 交换 2 个 unordered_map 容器存储的键值对,前提是必须保证这 2 个容器的类型完全相等。 |
| bucket_count() | 返回当前容器底层存储键值对时,使用桶(一个线性链表代表一个桶)的数量。 |
| max_bucket_count() | 返回当前系统中,unordered_map 容器底层最多可以使用多少桶。 |
| bucket_size(n) | 返回第 n 个桶中存储键值对的数量。 |
| bucket(key) | 返回以 key 为键的键值对所在桶的编号。 |
| load_factor() | 返回 unordered_map 容器中当前的负载因子。负载因子,指的是的当前容器中存储键值对的数量(size())和使用桶数(bucket_count())的比值,即 load_factor() = size() / bucket_count()。 |
| max_load_factor() | 返回或者设置当前 unordered_map 容器的负载因子。 |
| rehash(n) | 将当前容器底层使用桶的数量设置为 n。 |
| reserve() | 将存储桶的数量(也就是 bucket_count() 方法的返回值)设置为至少容纳count个元(不超过最大负载因子)所需的数量,并重新整理容器。 |
| hash_function() | 返回当前容器使用的哈希函数对象。 |
7. AVL实现map
7.1 基本概念
AVL 和 红黑树都是一种自平衡的二叉搜索树,它们在保持二叉搜索树基本性质的同时,通过特定的平衡机制来确保树的高度始终不超过1(树上任一节点的左子树和右子树的高度之差不超过 1).
二叉搜索树(BST)满足下列三点性质:
- 左子树上所有节点的关键字均小于根节点的关键字
- 右子树上所有节点的关键字均大于根节点的关键字
- 左子树和右子树又各是一颗二叉搜索树
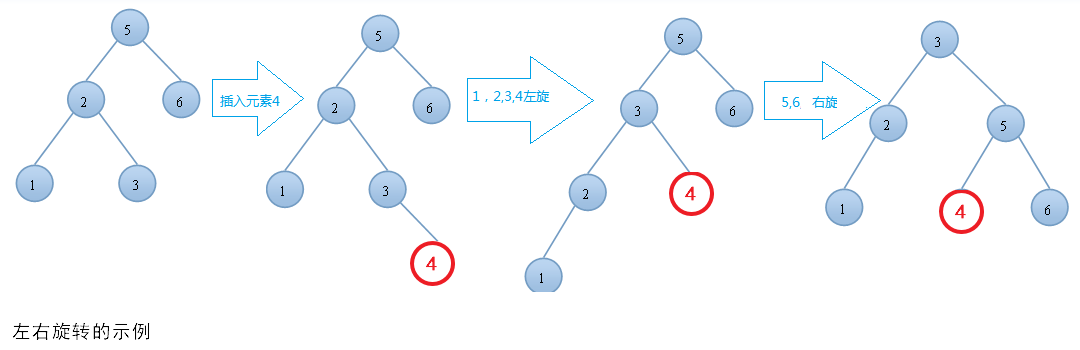
如下图所示:
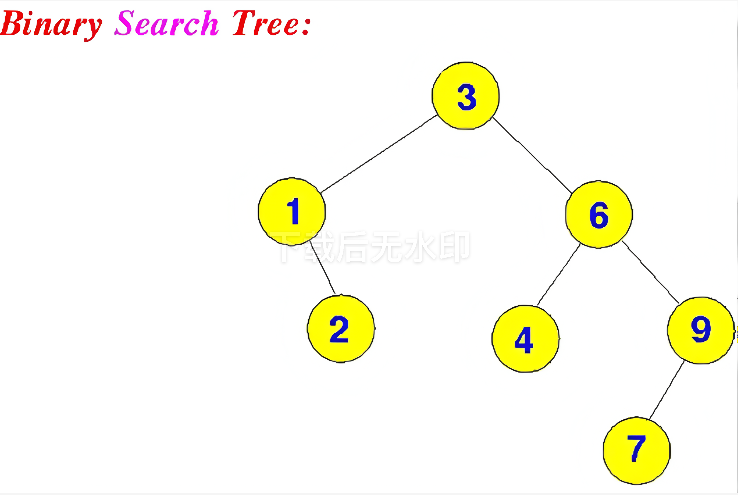
二叉搜索树只需要满足:左子树节点值<根节点值<右子树节点值
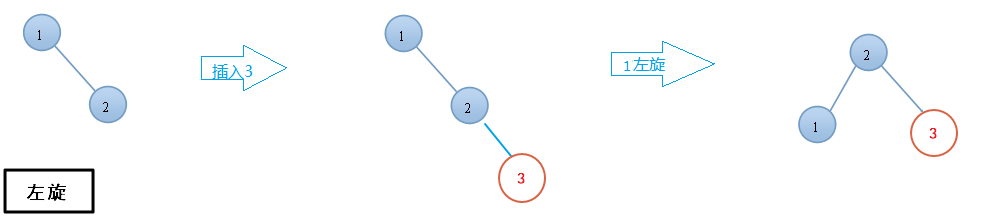
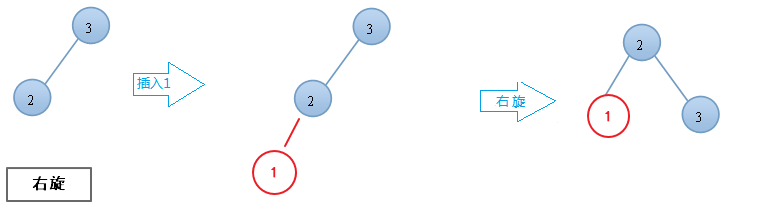
当插入或删除操作导致 AVL 树的某个节点的平衡因子超出了 -1 到 1 的范围时,AVL树实现平衡的方式是通过旋转操作:
- 左旋:将一个节点的右子树提升为根节点,原根节点变为新根节点的左子树。
- 右旋:将一个节点的左子树提升为根节点,原根节点变为新根节点的右子树。
- 左右旋:先对左子树进行左旋,再对根节点进行右旋。
- 右左旋:先对右子树进行右旋,再对根节点进行左旋。
7.2 实现
在实现之前,必须要注意:键类型KeyType必须支持比较操作,能够使用比较运算符 opeator<。若是自定义结构,必须重载 opeator<:
1 | struct CustomKey { |
7.2.1 模板化AVL树节点
将AVLNode结构模板化,使其能够处理不同类型的键和值。假设键类型KeyType支持操作运算符operator<进行比较,因为AVL树需要对键进行排序以维护其性质。**如果自定义的键类型不支持操作运算符operator<进行比较,我们需要在该类型中重载operator<**。
首先,我们定义AVL树的节点。每个节点包含一个键(key)、一个值(value)、节点高度(height),以及指向左子节点和右子节点的指针。
1 |
|
7.2.2 辅助函数模板化
辅助函数同样需要模板化,以适应不同的AVLNode类型。
7.2.2.1 获取节点高度
获取节点的高度。如果节点为空,则高度为0
1 | template <typename KeyType, typename ValueType> |
7.2.2.2 获取平衡因子
左子树高度减去右子树高度就是平衡因子
1 | template <typename KeyType, typename ValueType> |
7.2.2.3 右旋
右旋转用于处理左子树过高的情况
1 | y x |
1 | template <typename KeyType, typename ValueType> |
7.2.2.4 左旋
左旋转用于处理右子树过高的情况
1 | x y |
1 | template <typename KeyType, typename ValueType> |
7.2.3 AVL树的核心操作模板化
7.2.3.1 节点插入
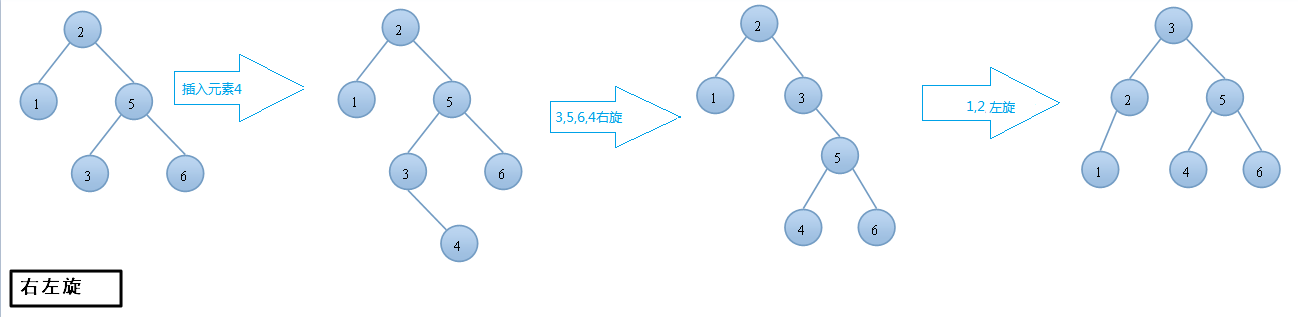
插入操作遵循标准的二叉搜索树插入方式,然后通过旋转保持树的平衡。如果插入一个新节点,可能会遇到以下情况:
如果插入 28,就需要我们将插入后的树先进行左旋,然后右旋,当然还可能有其他情况。
1 | AVLNode<KeyType, ValueType>* insertNode(AVLNode<KeyType, ValueType>* node, // 当前节点 |
1 | 8 (balance = 2) |
对于上面这种情况,插入5,满足左右,我们先要对 4 进行左旋,然后对8进行右旋
1 | 4 (balance = -2) |
对于上面这种情况,插入7,满足右左,我们先要对 8 进行右旋,然后对4进行左旋
这两种情况很特殊,必须要这样操作
7.2.3.2 获取最小值节点
用于删除节点时找到中序后继。
1 | AVLNode<KeyType, ValueType>* getMinValueNode(AVLNode<KeyType, ValueType>* node) { |
7.2.3.3 查找给定节点的value值
按键查找节点,返回对应的值。如果键不存在,返回nullptr。
1 | ValueType* searchNode(AVLNode<KeyType, ValueType>* node, const KeyType& key) { |
7.2.3.3 删除节点(BST节点删除方式)
删除操作分为三种情况:删除节点无叶子节点、有一个子节点或有两个子节点。删除后,通过旋转保持树的平衡。删除方式和BST的方式一样:
- 若被删除节点 z 是叶节点,则直接删除 z,不会破坏BST的性质
- 若节点 z 只有一颗左子树或右子树,则让 z 的子树成为 z 的父节点的子树,覆盖 z 的位置
- 若节点 z 有左右两颗子树,则令 z 的中序后继(或中序前驱)代替 z(仅仅是键值对代替,z 的左右子树指向仍不变),然后从BST中删除这个中序后继(中序前驱),这样就成了第一种或第二种情况
z 的中序后继:z 的右子树中最左下节点(最小),该节点一定没有左子树
z 的中序前驱:z 的左子树中最右下节点,该节点一定没有右子树
以BST方式将指定节点删除后,需要重新旋转,以保持平衡。
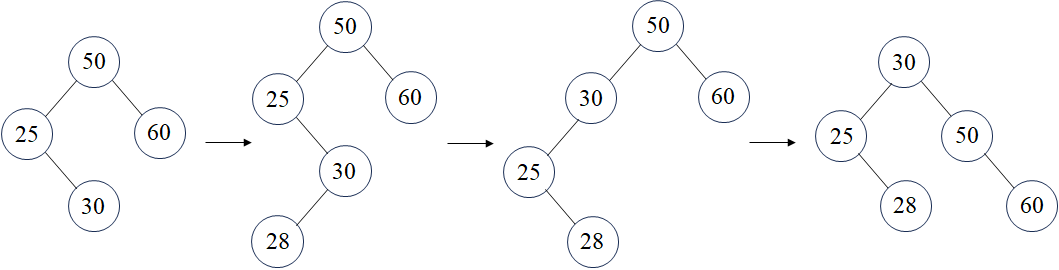
1 | AVLNode<KeyType, ValueType>* deleteNode(AVLNode<KeyType, ValueType>* root, const KeyType& key) { |
1 | 50 |
对于上面这种情况,删除 60,满足左右,我们先要对 30 进行左旋,然后对50进行右旋
1 | 50 |
对于上面这种情况,删除 20,满足右左,我们先要对 70 进行右旋,然后对50进行左旋
7.2.3.4 中序遍历
1 | // 中序遍历辅助函数 |
能够将 key 从小到大依次遍历
7.2.4 AVLMap的操作
现在,我们将所有模板化的函数集成到一个模板类AVLMap中。这个类将提供如下功能:
put(const KeyType& key, const ValueType& value):插入或更新键值对。get(const KeyType& key):查找键对应的值,返回指向值的指针,如果键不存在则返回nullptr。remove(const KeyType& key):删除指定键的键值对。inorderTraversal():中序遍历,返回有序的键值对列表。
1 | // 插入或更新键值对 |
7.2.5 完整代码
1 |
|
该代码仍有很多地方需要优化改进:
内存管理:当前实现使用递归进行插入和删除,如果树非常深,可能会导致栈溢出。可以考虑使用迭代方法或优化递归深度。
缓存友好:使用自适应数据结构(如缓存友好的节点布局)可以提升性能。
多线程支持:当前实现不是线程安全的。如果需要在多线程环境中使用,需要添加适当的同步机制。
也可以添加其他功能:
迭代器:实现输入迭代器、中序遍历迭代器,以便支持范围基(range-based)
for循环。查找最小/最大键:提供方法
findMin()和findMax()。前驱/后继查找:在树中查找给定键的前驱和后继节点。
支持不同的平衡因子策略:例如,允许用户指定自定义的平衡策略。
8. 红黑树
8.1 基本概念
红黑树也是一种二叉搜索树(BST),因为AVL树在高度差大于1之后需要让它进行旋转处理来维持平衡状态,这个过程的成本不低,因此才开发出来了红黑树。
对于二叉搜索树(BST),如果插入的数据是随机的,那么它就是接近平衡的二叉树,平衡的二叉树,它的操作效率(查询,插入,删除)效率较高,时间复杂度是O(logN)。但是可能会出现一种极端的情况,那就是插入的数据是有序的(递增或者递减),那么所有的节点都会在根节点的右侧或左侧,此时,二叉搜索树就变为了一个链表,它的操作效率就降低了,时间复杂度为O(N),所以可以认为二叉搜索树的时间复杂度介于O(logN)和O(N)之间。那么为了应对这种极端情况,红黑树就出现了,它是具备了某些特性的二叉搜索树,能解决非平衡树问题,红黑树是一种接近平衡的二叉树(说它是接近平衡因为它并没有像AVL树的平衡因子的概念,它只是靠着满足红黑节点的5条性质来维持一种接近平衡的结构,进而提升整体的性能,并没有严格的卡定某个平衡因子来维持绝对平衡)。其查找、插入、删除)的时间复杂度同样为 O(log n)。
红黑树在每个节点增加了一个存储位记录节点的颜色,可以是RED,也可以是BLACK;通过任意一条从根到叶子简单路径上颜色的约束,红黑树保证最长路径不超过最短路径的二倍,因而近似平衡(最短路径就是全黑节点,最长路径就是一个红节点一个黑节点,当从根节点到叶子节点的路径上黑色节点相同时,最长路径刚好是最短路径的两倍)。它同时满足以下五条特性:
- 节点颜色:每个节点要么是红色,要么是黑色。
- 根节点颜色:根节点是黑色。
- 叶子节点颜色:所有叶子节点(NULL 节点,即空节点)都是黑色的。这里的叶子节点不存储实际数据,仅作为树的终端。
- 红色节点限制:如果一个节点是红色的,则它的两个子节点都是黑色的。也就是说,红色节点不能有红色的子节点(不能有2个连续的红色节点,但可以有2个连续的黑色节点)。
- 黑色平衡:从任意节点到其所有后代叶子节点的路径上,包含相同数量的黑色节点。这被称为每条路径上的黑色高度相同。
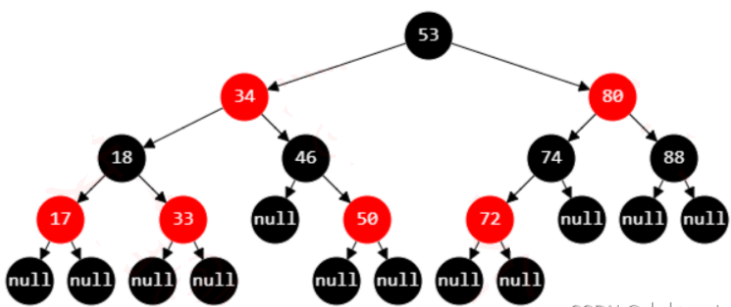
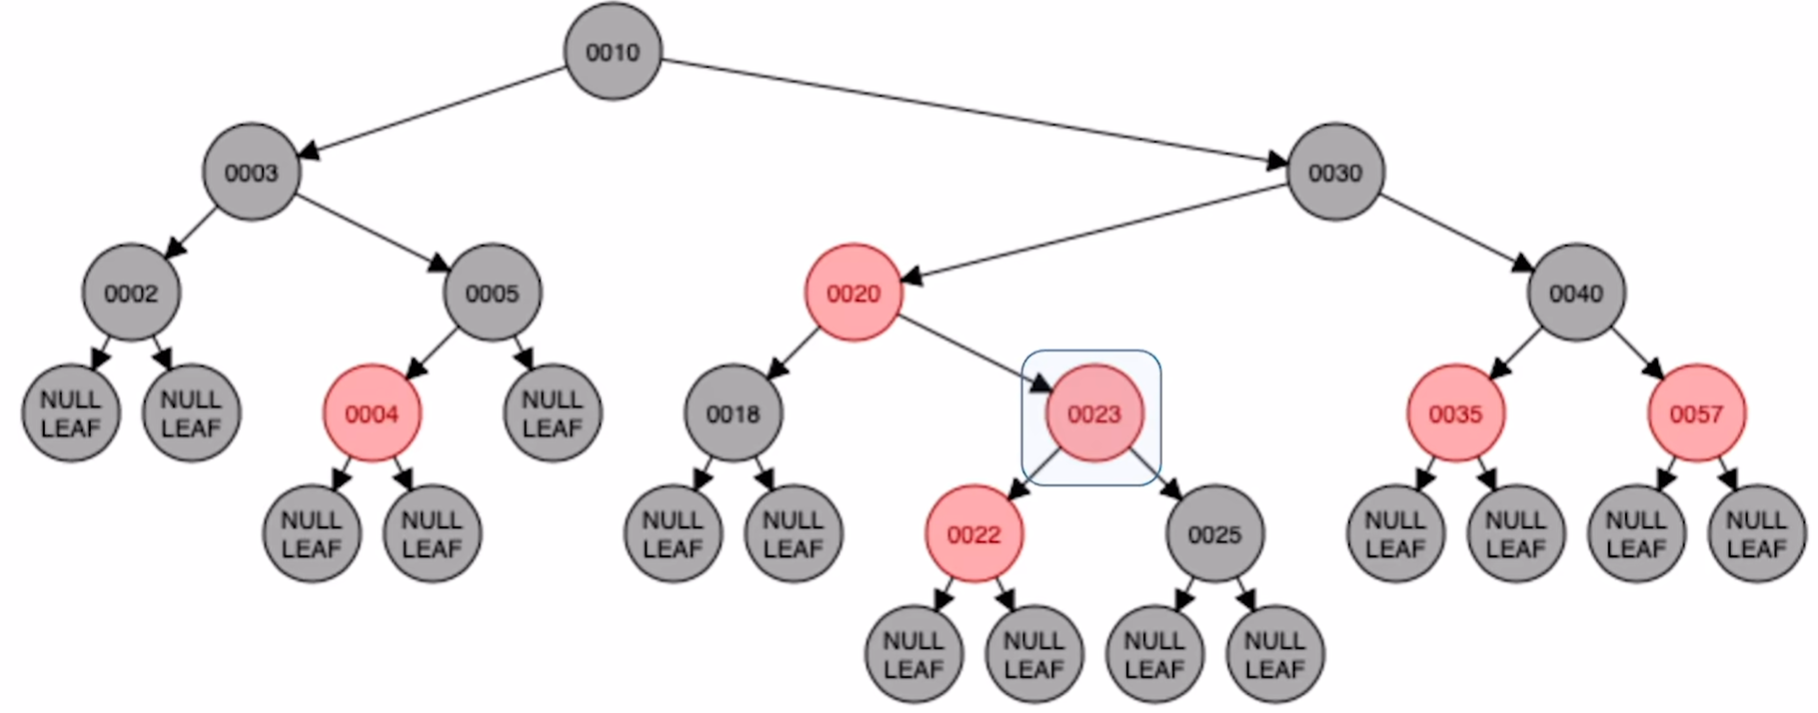
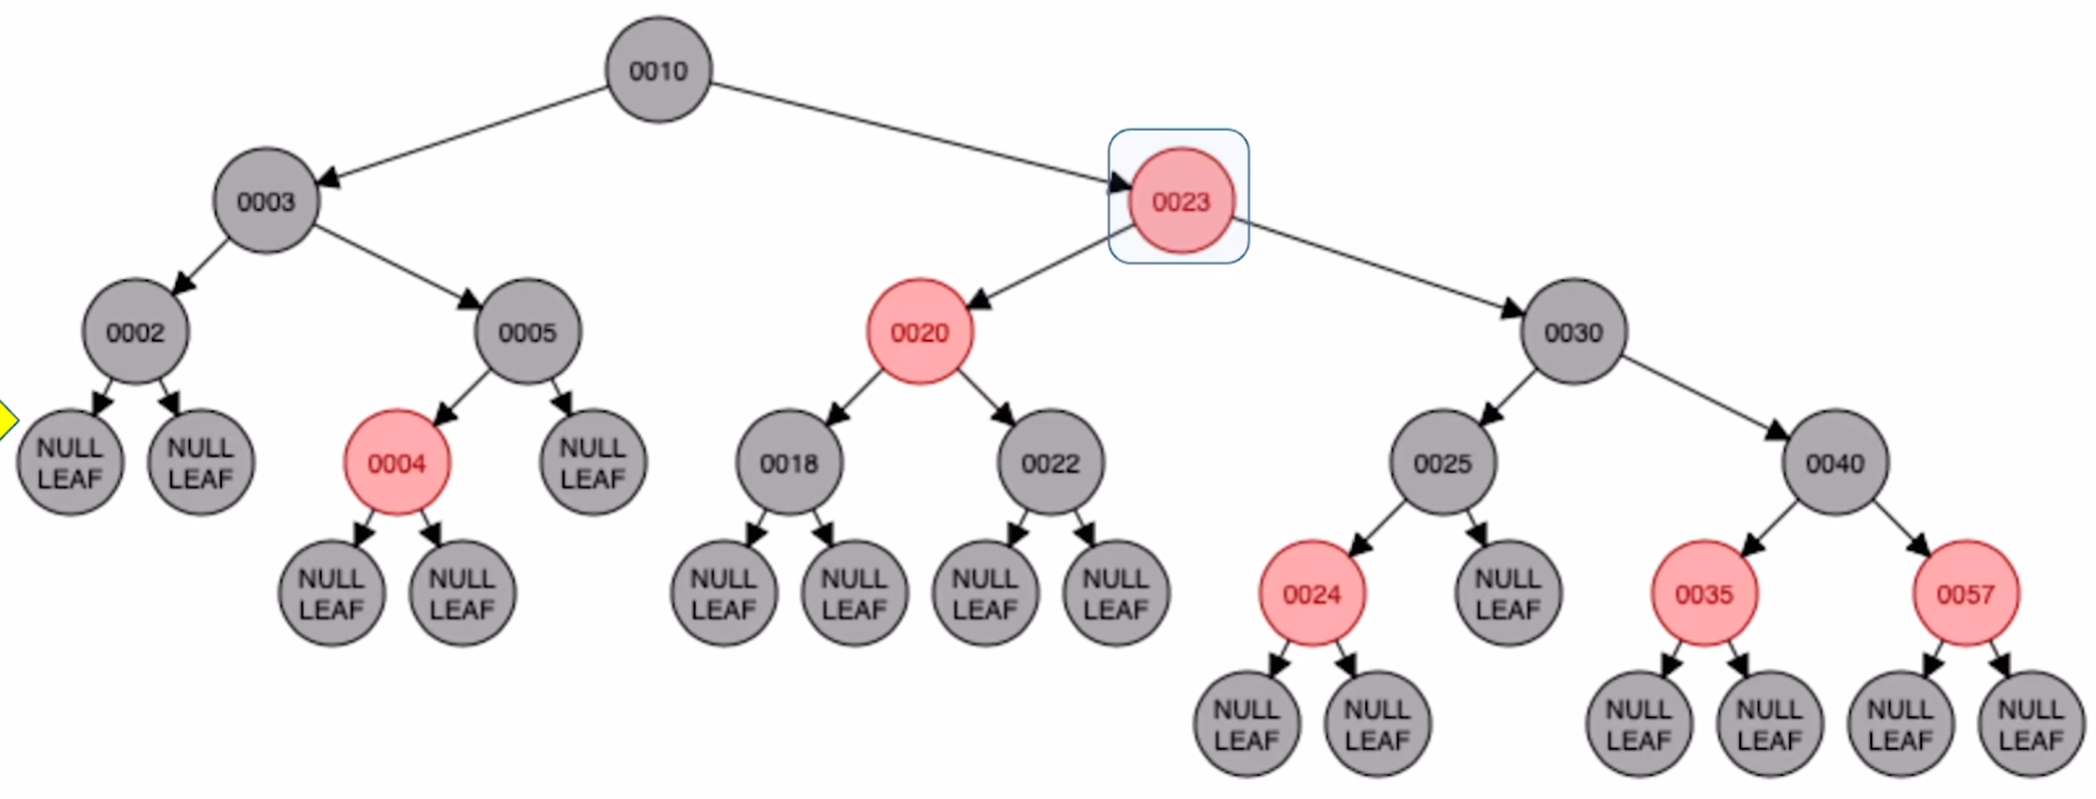
判断下面的树是否为红黑树:
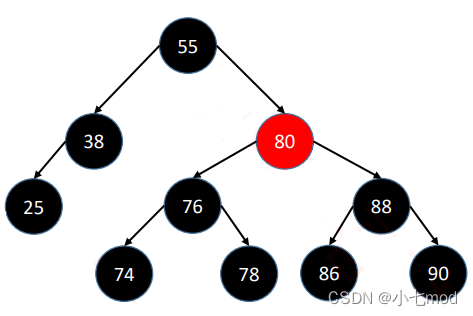
上面这棵树首先很容易就能知道是满足性质1-4条的,关键在于第5条性质,可能乍一看好像也是符合第5条的,但实际就会陷入一个误区,直接将图上的最后一层的节点看作叶子节点,这样看的话每一条从根节点到叶子节点的路径确实都经过了3个黑节点。
但实际上,在红黑树中真正被定义为叶子节点的,是那些空节点,如下图。
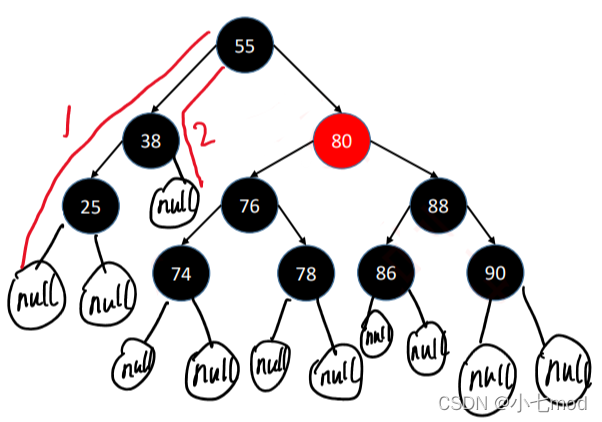
这样一来,路径1有4个黑色节点(算上空节点),路径2只有3个黑色节点,这样性质5就不满足了,所以这棵树并不是一个红黑树节点。
红黑树 vs AVL 树
| 特性 | 红黑树 (Red-Black Tree) | AVL 树 (AVL Tree) |
|---|---|---|
| 平衡性 | 相对不严格,每个路径上的黑色节点相同。 | 更严格,任意节点的左右子树高度差不超过1。 |
| 插入/删除效率 | 较快,插入和删除操作较少的旋转,适用于频繁修改的场景。 | 较慢,插入和删除可能需要多次旋转,适用于查找操作多于修改的场景。 |
| 查找效率 | O(log n) | O(log n),常数因子更小,查找速度略快。 |
| 实现复杂度 | 相对简单,旋转操作较少。 | 实现较复杂,需严格维护高度平衡。 |
| 应用场景 | 操作频繁、需要快速插入和删除的场景。 | 查找操作频繁、插入和删除相对较少的场景。 |
之所以红黑树的查找效率低于AVL树是因为,红黑树在查找时和普通的相对平衡的二叉搜索树(BST)的效率相同,都是通过相同的方式来查找的,没有用到红黑树特有的特性。但如果插入的时候是有序数据,那么红黑树的查询效率就比二叉搜索树(BST)要高了,因为此时二叉搜索树不是平衡树,它的时间复杂度O(N)。
红黑树不是严格意义上的高度平衡树,其树高可能相对 AVL 树略高,所以查找操作的平均时间复杂度虽然也是O(logn),但在相同节点数量的情况下,查找路径可能会略长一些,查找效率相对 AVL 树稍低。而AVL树严格的平衡特性保证了 AVL 树的查找路径长度相对较短,查找操作的性能更稳定,在查找密集型的应用场景中,AVL 树通常能够更快地找到目标节点,具有更好的查找性能。
常数因子差异:
- 红黑树的每次比较需要处理颜色标志(虽然硬件层面影响微小,但累积效应存在)。
- 红黑树的路径长度方差更大(部分路径较长),可能导致更多的分支预测失败(CPU 流水线效率降低)。
8.2 基本操作
8.2.1 插入
8.2.1.1 概念
红黑树的插入操作通常分为以下两个主要步骤:
标准二叉搜索树插入:根据键值比较,将新节点插入到合适的位置,初始颜色为红色(染成红色是为了保证第5条性质)。
插入后的修正(Insert Fixup):通过重新着色和旋转操作,恢复红黑树的五大性质。
BST 的插入不过多介绍,保证左子树节点值<根节点值<右子树节点值即可,这里详细分析插入后的修正。
因为新插入的节点 z 默认颜色是红色,则需满足以下情况:
父节点为黑色:
- 如果 z 的父节点是黑色的,那么插入操作不会破坏红黑树的性质,修正过程结束。
父节点为红色:
情况1:z 的叔叔节点(即 z 的父节点的兄弟节点)也是红色。
将父节点和叔叔节点重新着色为黑色。
将祖父节点重新着色为红色。
将 z 指向祖父节点,继续检查上层节点,防止高层的性质被破坏。
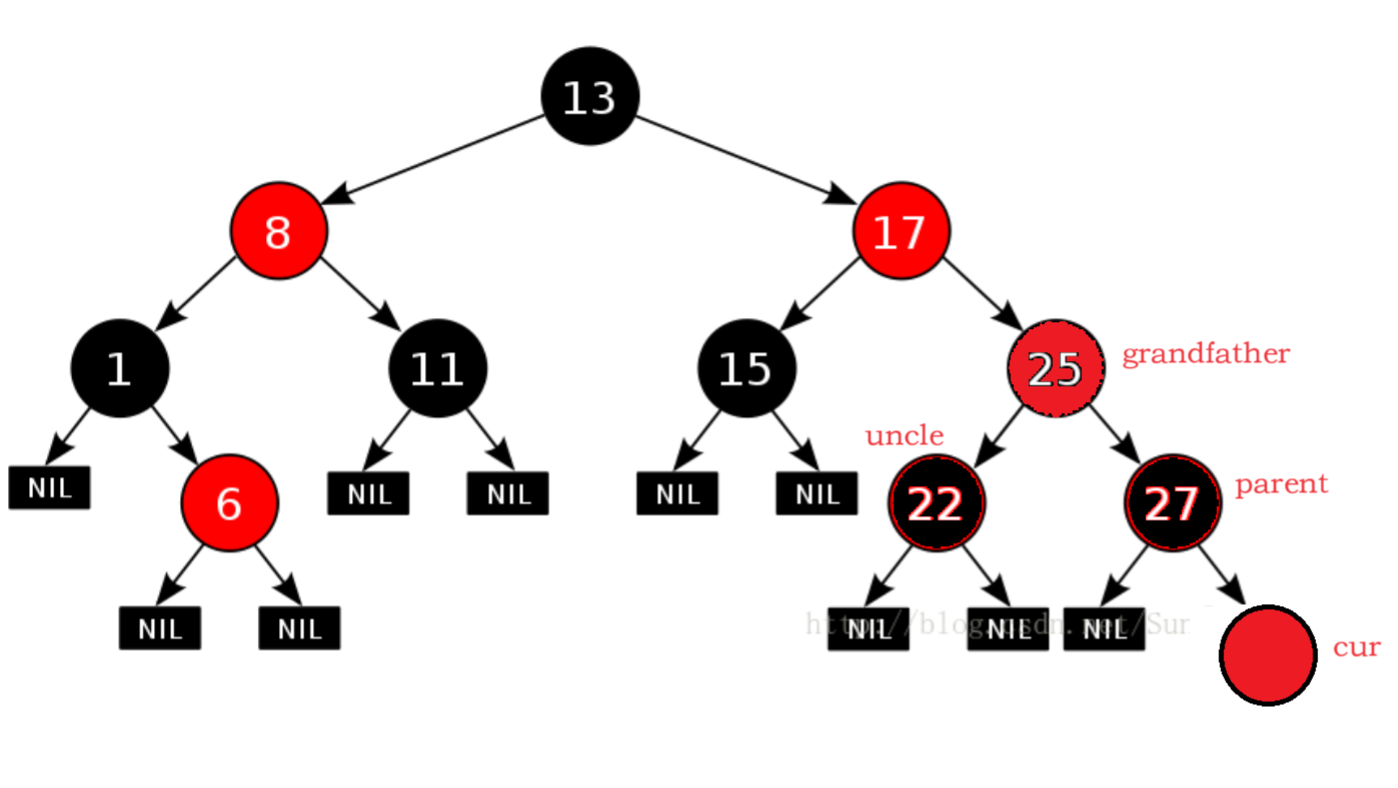
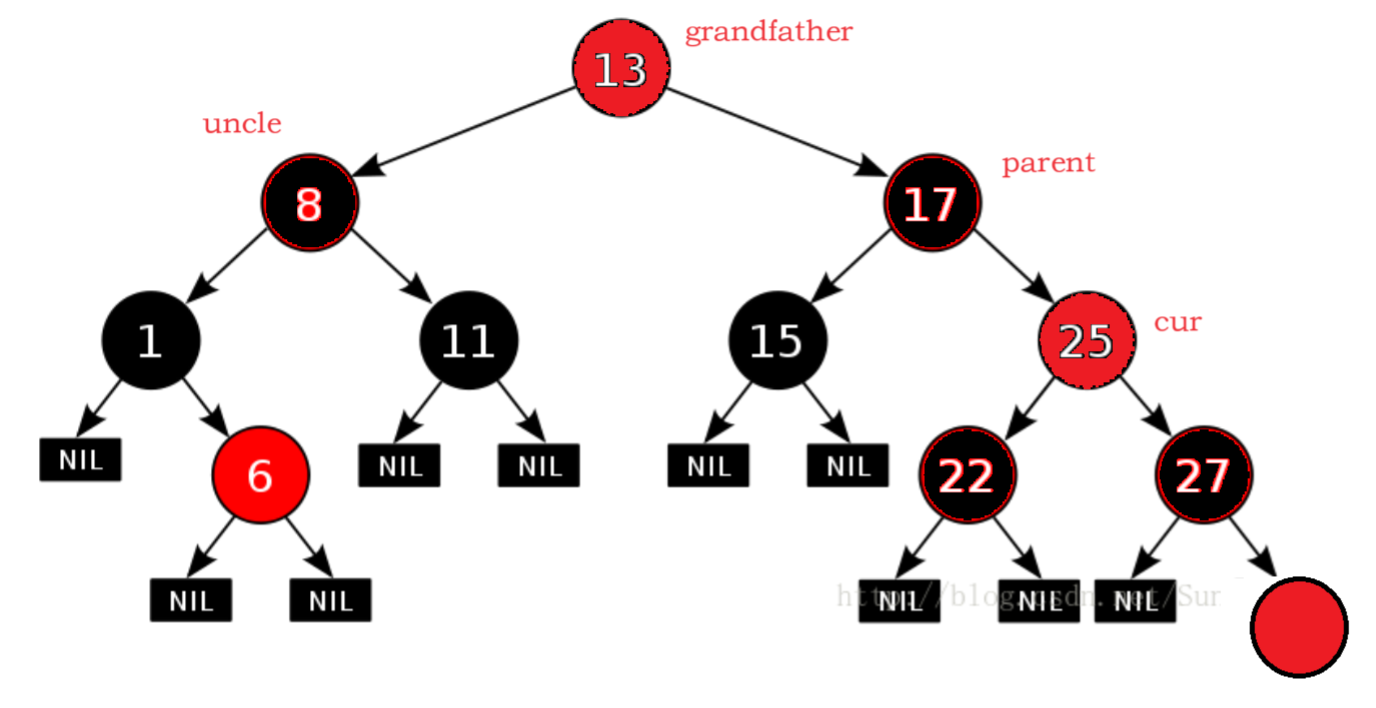
情况2:z 的叔叔节点是黑色
- LL型:右单旋,父换爷+染色
- RR型:左单旋,父换爷+染色
- LR型:左、右双旋,儿换爷+染色
- RL型:右、左双旋,儿换爷+染色
针对情况一:

将父节点和叔叔节点重新着色为黑色,将祖父节点重新着色为红色
将 z 指向祖父节点(将grandfather看作插入节点,修正上层颜色,而不是将插入节点覆盖到grandfather),继续检查上层节点,防止高层的性质被破坏。
将父节点和叔叔节点重新着色为黑色,将祖父节点重新着色为红色。此时祖父节点是根节点,则将祖父节点改为黑色。
针对情况二:
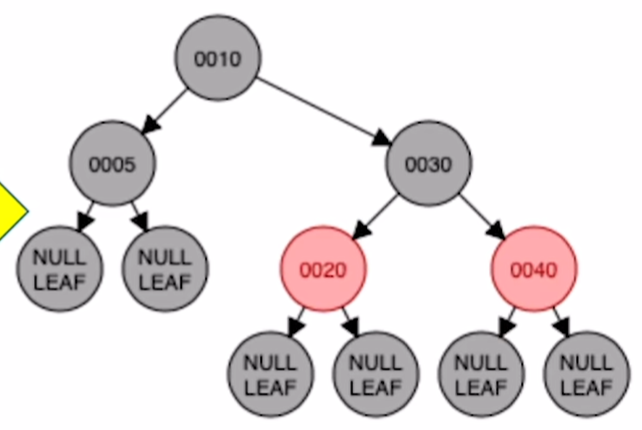
a)LL型别:插入 5
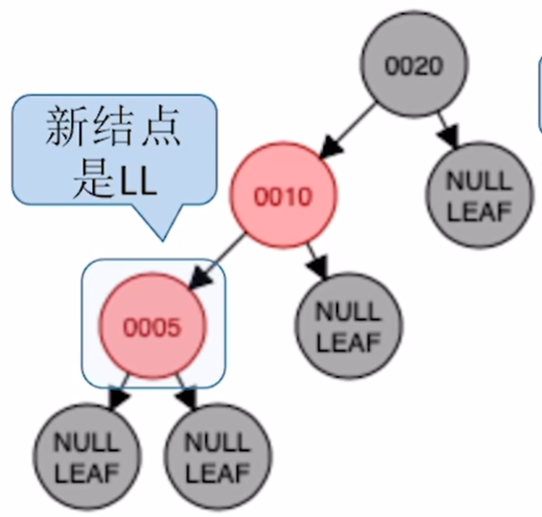
对祖父进行右旋
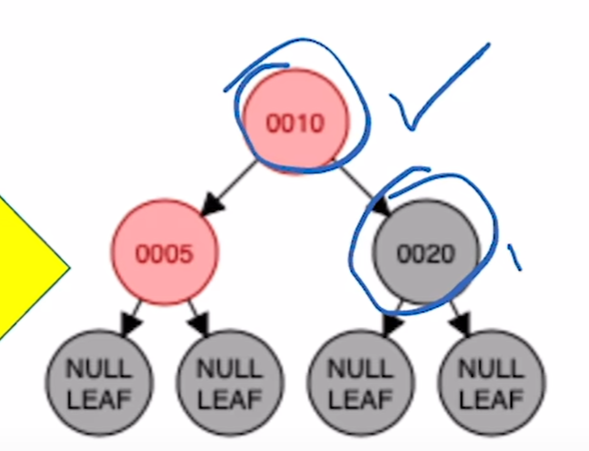
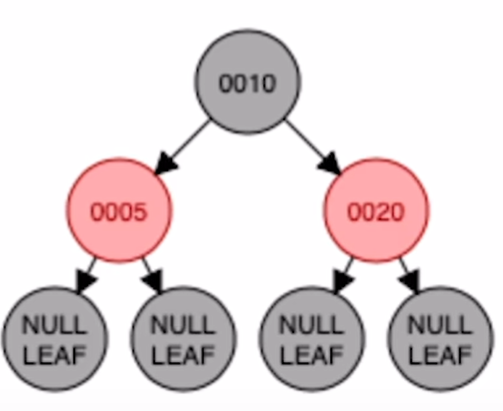
将父节点重新着色为黑色,祖父染色为红色
b)RR型:插入 40
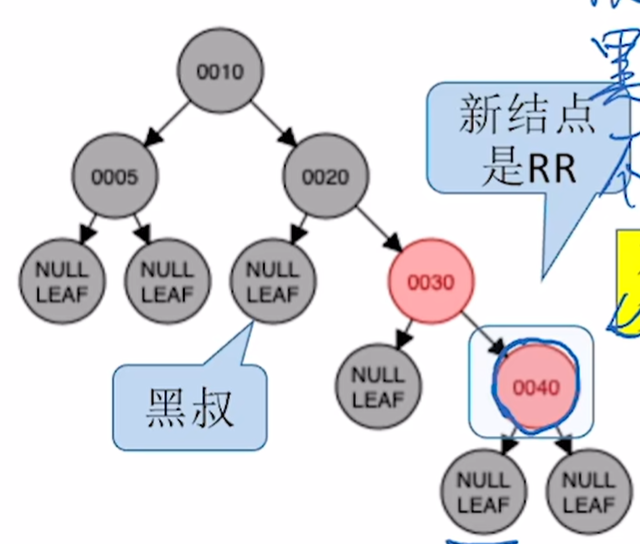
对祖父左单旋
将祖父节点染红,父亲节点染黑
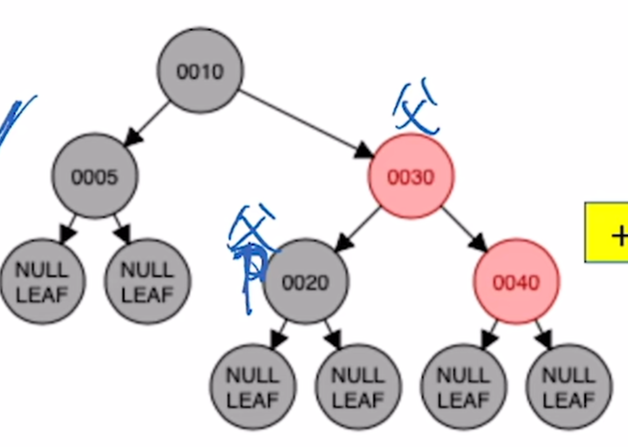
c)LR型:插入 23
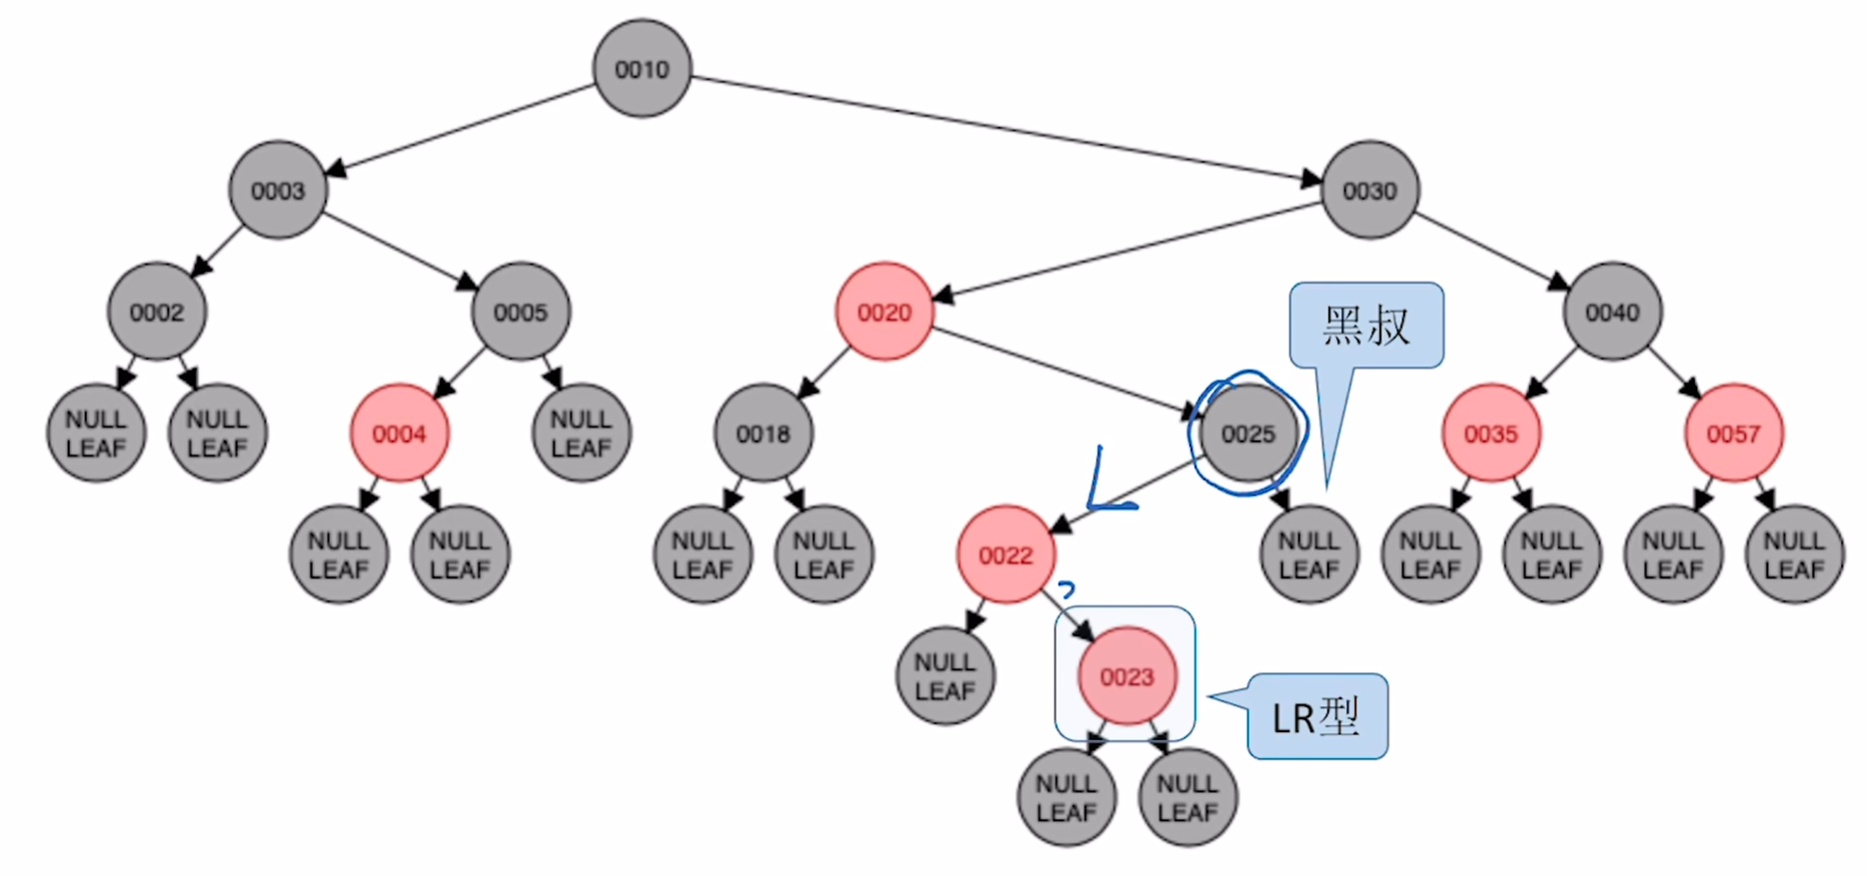
对父节点进行左旋
对 25 进行右旋
将原本的祖父节点和插入节点颜色互换
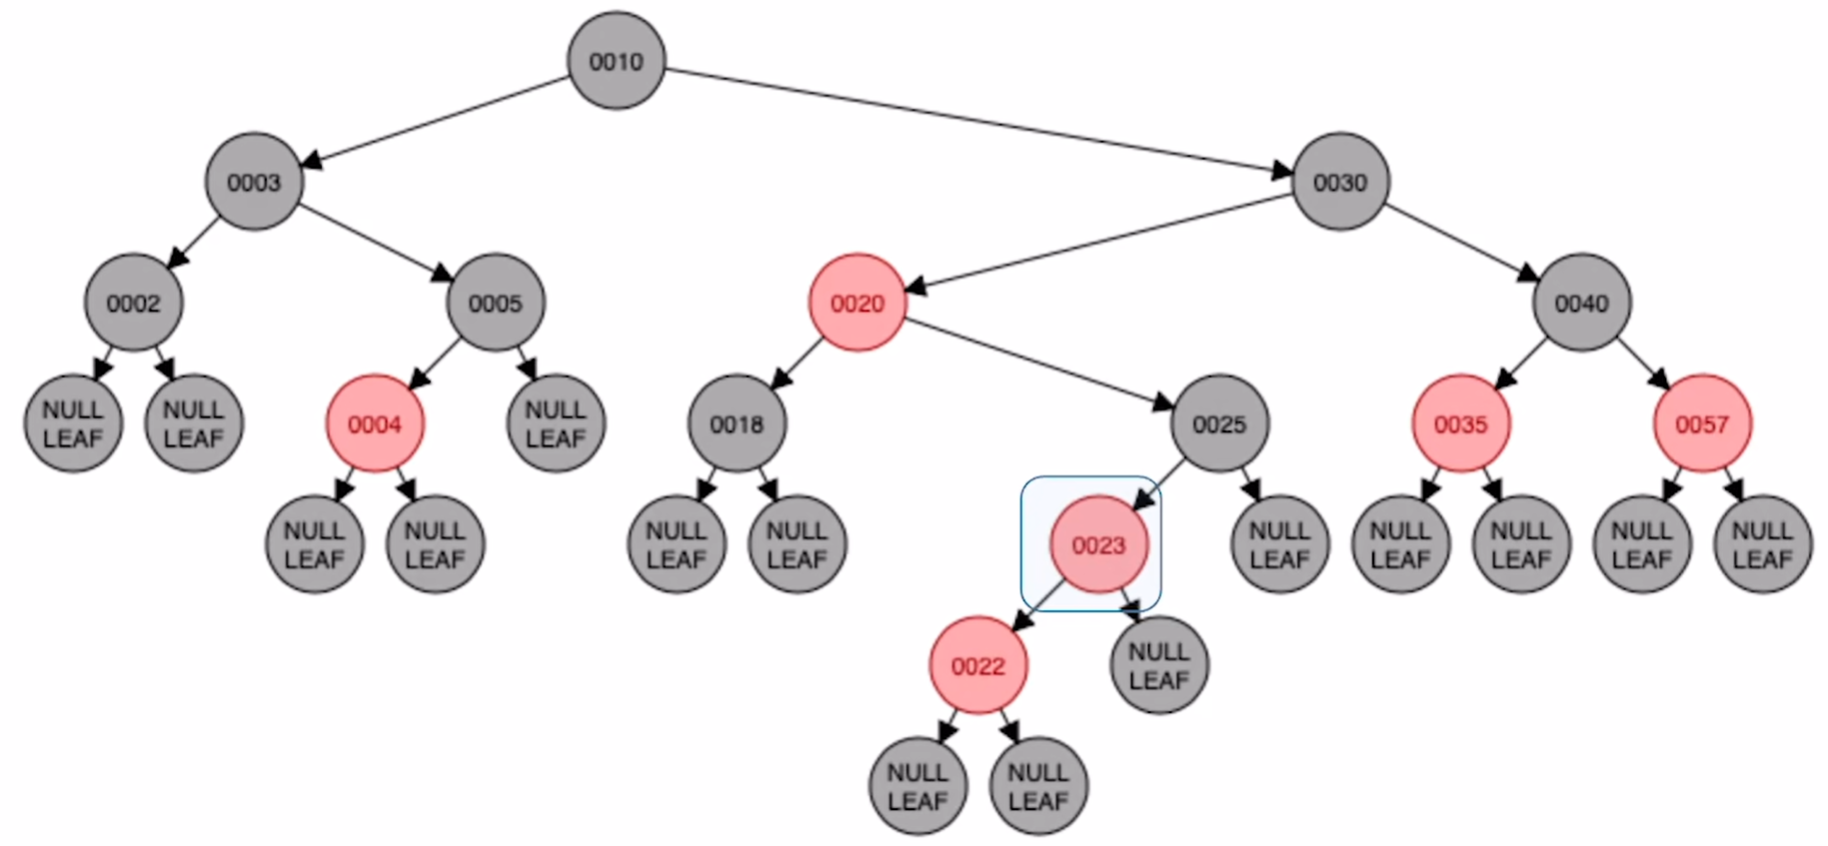
d)RL型别:情况一处理完转到祖父节点后发现,23 是RL型别
对20进行右旋
对30进行左旋
30和23颜色互换
8.2.1.2 代码
1 | bool Insert(const pair<K,V> &kv) |
8.2.2 删除
删除操作同样重要且复杂,因为它可能破坏红黑树的多个性质。与插入类似,删除操作也需要两个主要步骤:
标准二叉搜索树删除:按照 BST 的规则删除节点。
删除后的修正(Delete Fixup):通过重新着色和旋转操作,恢复红黑树的性质。
删除操作分为以下步骤:
定位要删除的节点:
如果要删除的节点 z 有两个子节点,则找到其中序后继节点 y(即 z 的右子树中的最小节点)。
将 y 的值复制到 z,然后将删除目标转移到 y。
删除节点:
若 y 只有一个子节点 x(可能为 NIL),则用 x 替代 y 的位置。
记录被删除节点的原颜色 y_original_color。
删除修正(仅当 y_original_color 为黑色时):
- 因为删除一个黑色节点会影响路径上的黑色数量,需通过多次调整来恢复红黑树的性质。
修正流程:
初始化:设 x 为替代被删除的节点的位置,x 可能为实际节点或 NIL 节点。
循环修正:
当 x 不是根节点,且 x 的颜色为黑色,进入修正循环。
判断 x 是其父节点的左子节点还是右子节点,并相应地设定兄弟节点 w。
处理不同情况:
情况1:w 是红色的。
情况2:w 是黑色,且 w 的两个子节点都是黑色。
情况3:w 是黑色,且 w 的左子节点是红色,右子节点是黑色。
情况4:w 是黑色,且 w 的右子节点是红色。
将 w 重新着色为黑色。
将 x 的父节点重新着色为红色。
对 x 的父节点进行左旋转或右旋转,取决于是左子节点还是右子节点。
更新 w,继续修正过程。
将 w 重新着色为红色。
将 x 设为其父节点,继续修正。
将 w 的左子节点重新着色为黑色。
将 w 重新着色为红色。
对 w 进行右旋转或左旋转,取决于是左子节点还是右子节点。
更新 w,进入情况4。
将 w 的颜色设为 x 的父节点颜色。
将 x 的父节点重新着色为黑色。
将 w 的右子节点重新着色为黑色。
对 x 的父节点进行左旋转或右旋转,取决于是左子节点还是右子节点。
结束修正。
- 最终步骤:将 x 设为根节点,并将其颜色设为黑色,确保根节点的颜色为黑色。
8.3 红黑树节点
1 | enum Color { RED, BLACK }; |
9. unordered_map
9.1 哈希表概念
哈希表(散列表)是一种基于键值对的数据结构,通过哈希函数(Hash Function)将键映射到表中的一个索引位置,以实现快速的数据访问。哈希表的关键特性包括:
哈希函数:将键映射到表中一个特定的桶(Bucket)或槽(Slot)。
同义词:若不同的关键字通过哈希函数映射到同一个值,则为同义词
冲突解决:当不同的键通过哈希函数映射到同一个桶时,需要一种机制来处理这些冲突。常见的方法有拉链法(Separate Chaining)和开放定址法(Open Addressing)。
装填因子:表中已存储元素的数量与表长度之间的比率。
1)哈希表的作用
哈希表就是在关键字和存储位置之间建立对应关系,使得元素的查找可以以**O(1)**的效率进行, 其中关键字和存储位置之间是通过散列函数建立关系,记为:
$$
Loc(i)=Hash(key)
$$
2)常见的哈希函数
a. 除留余数法——H(key)=key%p
哈希表表长为m,取一个不大于m但最接近或等于m的质数p(除了1和本身外,不能被其他自然数整除的数)
b. 直接定址法——H(key)=key or H(key)=a*key + b
3)冲突解决方法
a. 拉链法
将具有相同存储地址的关键字链成一单链表,m个存储地址就设m个单链表,然后用一个数组将m个单链表的表头指针存储起来,形成一个动态的结构,假设散列函数为 Hash(key) = key %13,其拉链存储结构为:
b. 开放定址法
可存放新表项的空闲地址既向它的同义词表项开放,又向它的非同义词表项开放,m 是表长:
$$ {$H_i=(H(key)+d_i)%m$}
H_i=(H(key)+d_i)%m
$$
主要有以下三种处理方式:
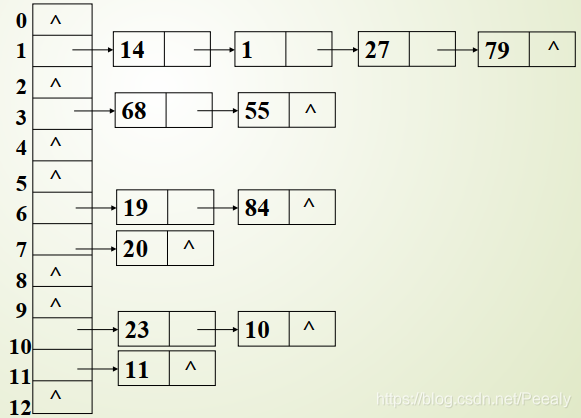
① 线性探测法:d_i = 1,2,3,…,m-1; 即发生冲突时(d_i:第i次冲突),每次往后探测相邻的下一个单元是否为空。该方法可能会导致冲突处理函数值域大于本来的值域,但无妨。
例如,有一组关键字(14,36,42,38,40,15,19,12,51,65,34,25),若表长 m 为15,散列函数为hash(key)=key%13,则可采用线性探测法处理冲突,构造该散列表。
按照关键字顺序,根据散列函数计算散列地址,如果该地址空间为空,则直接放入;如果该地址空间已存储数据,则采用线性探测法处理冲突。
[1] hash(14)=14%13=1,将14放入1号空间(下标为1);hash(36)=36%13=10,将36放入10号空间;hash(42)=42%13=3,将42放入3号空间;hash(38)=38%13=12,将38放入12号空间。

[2] hash(40)=40%13=1,1号空间已存储数据,采用线性探测法处理冲突。
hash′(40)=(hash(40)+di )%m ,di =1,…,m -1
d1 =1:hash′(40)=(1+1)%15=2,2号空间为空,将40放入2号空间,即hash(40)=40%13=1→2。

[3] hash(15)=15%13=2,2号空间已存储数据,发生冲突,采用线性探测法处理冲突。
hash′(15)=(hash(15)+di )%m ,di =1,…,m -1
d1 =1:hash′(15)=(2+1)%15=3,3号空间已存储数据,继续进行线性探测。
d2 =2:hash′(15)=(2+2)%15=4,4号空间为空,将15放入4号空间。
即hash(15)=15%13=2→3→4。

[4] hash(19)=19%13=6,将19放入6号空间;hash(12)=12%13=12,12号空间已存储数据,采用线性探测法处理冲突。
hash′(12)=(hash(12)+di )%m ,di =1,…,m -1
d 1 =1:hash′(12)=(12+1)%15=13,12号空间为空,将12放入13号空间,即hash(12)=12%13=12→13。

[5] hash(51)=51%13=12,12号空间已存储数据,采用线性探测法处理冲突。
hash′(51)=(hash(51)+di )%m,di =1,…,m -1
d1 =1:hash′(51)=(12+1)%15=13,13号空间已存储数据,继续进行线性探测。
d2 =2:hash′(51)=(12+2)%15=14,14号空间为空,将51放入14号空间。
即hash(51)=51%13=12→13→14。

[6] hash(65)=65%13=0,将65放入0号空间;hash(34)=34%13=8,将34放入8号空间;
hash(25)=12%13=12,12号空间已存储数据,采用线性探测法处理冲突。
hash′(25)=(hash(25)+di )%m ,di =1,…,m -1
d1 =1:hash′(25)=(12+1)%15=13,13号空间已存储数据,继续进行线性探测。
d2 =2:hash′(25)=(12+2)%15=14,14号空间已存储数据,继续进行线性探测。
d3 =3:hash′(25)=(12+3)%15=0,0号空间已存储数据,继续进行线性探测。
d4 =4:hash′(25)=(12+4)%15=1,1号空间已存储数据,继续进行线性探测。
d5 =5:hash′(25)=(12+5)%15=2,2号空间已存储数据,继续进行线性探测。
d6 =6:hash′(25)=(12+6)%15=3,3号空间已存储数据,继续进行线性探测。
d7 =7:hash′(25)=(12+7)%15=4,4号空间已存储数据,继续进行线性探测。
d8 =8:hash′(25)=(12+8)%15=5,5号空间为空,将25放入5号空间
即hash(25)=25%13=12→13→14→0→1→2→3→4→5。

注意: 线性探测法很简单,只要有空间,就一定能够探测到位置。但是,在处理冲突的过程中,会出现非同义词之间对同一个散列地址发生争夺的现象,称之为“堆积”。例如,上图中25和38是同义词,25和12、51、65、14、40、42、15均非同义词,却探测了9次才找到合适的位置,大大降低了查找效率。
②平方探测法:不同于前面线性探测法依次顺序查看下一个位置是否能存储元素,平方探测的规则是以 d_i = 1^2, -1^2, 2^2, -2^2,…, k^2, -k^2,其中 k <= m / 2。
当 ( H(key) + d_i ) < 0 或 > m 时,从表尾或表头重新开始。
使用平方探测法时,哈希表表长 m 必须是一个
4j + 3的素数,才能探测到所有位置。
例】设关键词序列为{47,7,29,11,9,84,54,20,30},散列表表长TableSize = 11,散列函数为:key % 11,用平方探测法处理冲突,列出依次插入后的散列表
| 操作 / 地址 | 0 | 1 | 2 | 3 | 4 | 5 | 6 | 7 | 8 | 9 | 10 | 说明 |
| 插入 47 | 47 | 无冲突 | ||||||||||
| 插入 7 | 47 | 7 | 无冲突 | |||||||||
| 插入 29 | 47 | 7 | 29 | d_i = 1 | ||||||||
| 插入 11 | 11 | 47 | 7 | 29 | 无冲突 | |||||||
| 插入 9 | 11 | 47 | 7 | 29 | 9 | 无冲突 | ||||||
| 插入 84 | 11 | 47 | 84 | 7 | 29 | 9 | d_2 = -1 | |||||
| 插入 54 | 11 | 47 | 84 | 7 | 29 | 9 | 54 | 无冲突 | ||||
| 插入 20 | 11 | 20 | 47 | 84 | 7 | 29 | 9 | 54 | d_3 = 4 | |||
| 插入 30 | 11 | 30 | 20 | 47 | 84 | 7 | 29 | 9 | 54 | d_3 = 4 |
③伪随机序列法:d_i 是一个伪随机序列